Merkle proof is used to validate data. It is used in distributed systems and peer-to-peer networks, like blockchain. Merkle proof are based on the Merkle Tree data structure. In this article, you will learn about Merkle Tree, a little bit about Hash functions, and the implementation of Merkle Proof.
Merkle Tree
A Merkle tree is a hash-based data structure used for data validation and synchronization. In this tree structure, each leaf node (last node in the tree) is a hash of a block of data, and the non-leaf node (parent node) is a hash of its children.

Merkle Tree uses hash functions, which make them efficient for data verification. In the next section, you will learn more about hash functions.
Hash Functions
Hash functions are methods that use cryptography to generate fixed-size output for an input of variable size. The generated result is unique for every input. This unique output is the key to efficient data validation.
There are hash functions that can generate output of varied sizes. However, in Merkle Tree, hash functions returning fixed-size output are used.
Merkle Proof
Merkle tree makes use of one-way hashing and is efficient for data validation. One-way hashes are intended to be collision-free and deterministic algorithms. This means that no two plaintext hashes can have the same value. Hence, Merkle trees are used in distributed systems and peer-to-peer networks. In this section, you will learn about Merkle proof and how to implement it.
Merkle proof is based on the Merkle tree data structure and is used to decide the following factors:
- If the data belongs in the tree
- To concisely prove the validity of data being part of a dataset without storing the whole data set
- To ensure the validity of a certain data set being inclusive in a larger data set without revealing either the complete data set or its subset.
In Merkle proof, a non-leaf node hashes the hash of its corresponding child nodes. This goes up the tree to obtain the root node whose hash can be publicly known. Consider the above diagram.
Hashing the hash of nodes A and B derives the non-leaf node H(AB). Similarly, hashing the hash of nodes H(AB) and H(CD) derives the non-leaf node H(ABCD). The root node H(ABCDEFGH) is derived by hashing the hash of H(ABCD) and H(EFGH).
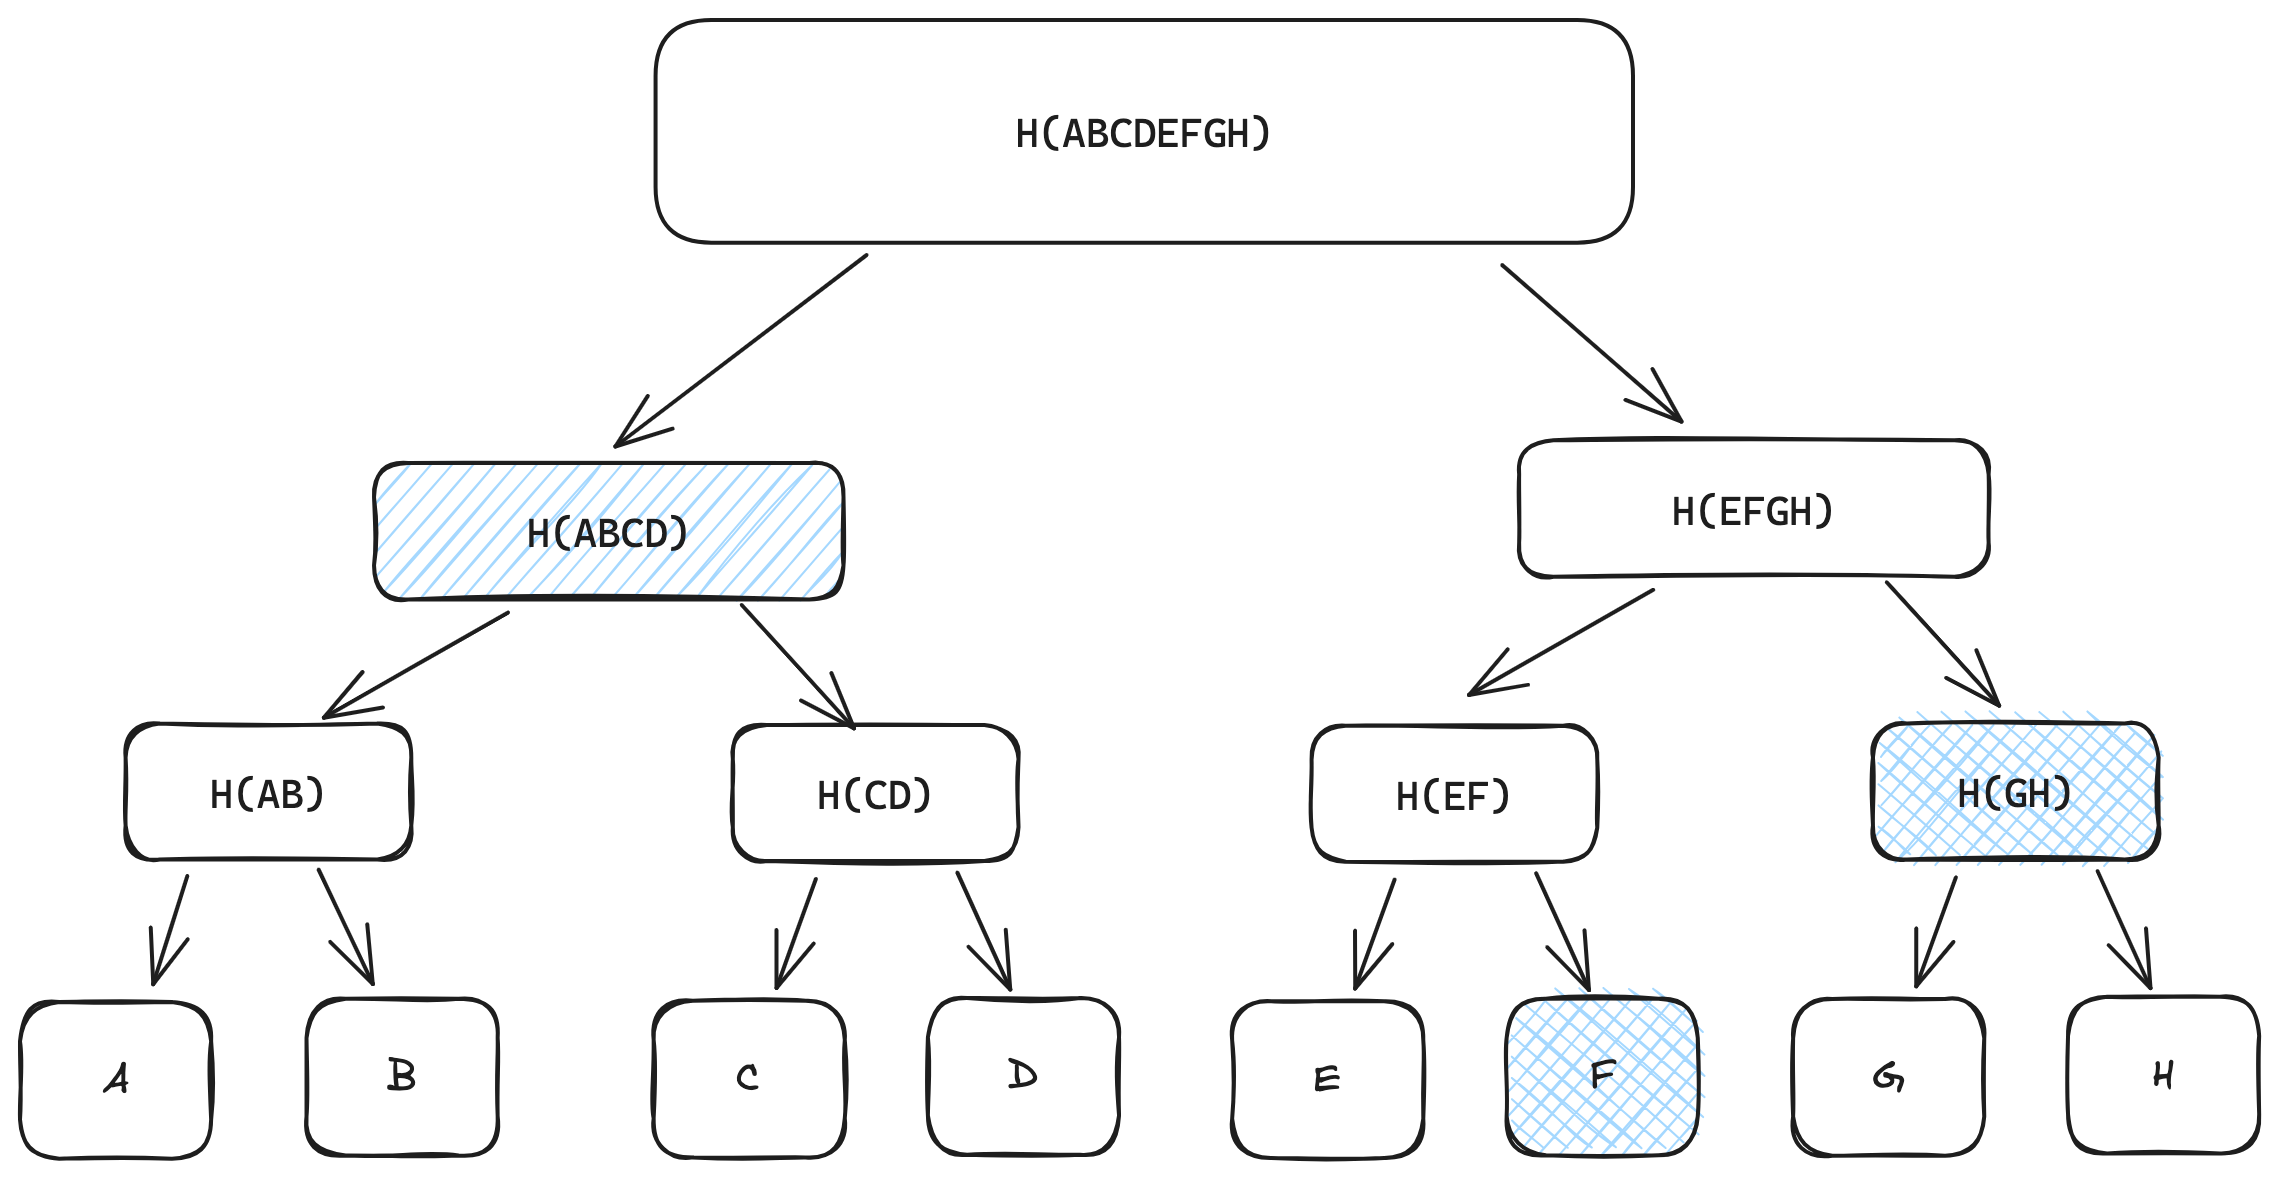
To prove that a particular node is a part of the tree, you don’t need the hash of all the nodes in the tree. You only need the proof path of that node. Let’s understand this using the above example Merkle tree. If you want to validate F in the tree, you need H(E), H(GH), and H(ABCD). H(F) and H(E) yield H(EF). H(EF), together with H(GH), yields H(EFGH). Hash H(ABCD) and H(EFGH), and you get the root node - H(ABCDEFGH). If the hash of the root doesn’t match the generated hash, the data is incorrect and might have been tampered with.
Implementing Merkle proof
In the previous section, you learned about the Merkle tree. You also learned about Merkle proof and how it works. In this section, you will implement Merkle proof in JavaScript.
Prerequisites
- Knowledge of JavaScript - You will implement Merkle proof in JavaScript. Hence, a basic understanding of JavaScript is required.
- Node.js - You will need Node.js installed on your machine. Download and install it from their website, if not already installed.
Quick Start
To get started quickly, clone or download this repository. Then, on your local machine, navigate to the project directory by running the following command in the terminal.
cd ~/[PATH]/merkle-proofReplace [PATH] with the path of the project directory.
Install the dependencies using the command npm install. Once the dependencies get installed, run the command node . to execute the code.
If you want to build the project from scratch and dive into the implementation, follow the below section.
Setting up the project
To get started, you need to set up the project directory. Follow the steps mentioned below to set up your project.
1. Initialize an empty node.js project
Create an empty directory with the following command.
// For Linux and Macmkdir merkle-proofNext, navigate to the newly created directory. Execute the following command to initialize a Node.js project.
npm init -y2. Install the dependencies
For the implementation of Merkle proof, you will use the merkletreejs package. This package provides all the required functions to construct a Merkle tree and generate and verify proof.
To use this package, run the following command in your terminal.
npm install merkletreejs3. Create index.js
You have initialized the project and installed the required dependencies. In this step, you will use the package to implement Merkle proof.
Create an index.js file at the root of the project. Next, import merkletreejs. Also, import the SHA256 function from the crypto-js package in the index.js file. The crypto-js package gets automatically installed when you install the merkletreejs package.
const { MerkleTree } = require('merkletreejs');const SHA256 = require('crypto-js/sha256');You can now use the functions available from the imported packages. In the next section, you will use some of these functions to construct a Merkle tree.
4. Construct a Merkle tree
In your index.js file, copy and paste the following code to construct a Merkle tree.
const data = ['a', 'b', 'c', 'd'];
const leaves = data.map((x) => SHA256(x));
const tree = new MerkleTree(leaves, SHA256);
const root = tree.getRoot().toString('hex');
In the above code, you define the data in the data variable. Next, you hash the data using the SHA256 hash function. You then create a new Merkle tree with the hashed data. Lastly, you get the root of the tree and return it as a hexadecimal string.
You now have a Merkle tree of the given data. You can modify the data array to generate a different Merkle tree. In the next section, you will implement Merkle proof and use it to validate data.
5. Implement Merkle proof
To implement Merkle proof, you will use the getProof() and verify() methods from the merkletreejs package. The getProof() method generates the proof path for the given hashed value. The verify() method uses this proof path, the hashed value, and the root value to verify data integrity. If the method returns true, it means that the data is a part of the tree, otherwise not.
In the index.js file, add the following code at the bottom.
const leafToProve = SHA256('c');
const proofPath = tree.getProof(leafToProve);
const belongsToTree = tree.verify(proofPath, leafToProve, root);
console.log(belongsToTree); // returns true
The above code hashes the value of c and then generates its proof path. Passing the hash value (leafToProve), the proof path (proofPath) and the root (root) in the verify() method returns the result. In this case, the result is true.
The finished index.js file should be as follows.
const { MerkleTree } = require('merkletreejs');const SHA256 = require('crypto-js/sha256');
const data = ['a', 'b', 'c', 'd'];
const leaves = data.map((x) => SHA256(x));
const tree = new MerkleTree(leaves, SHA256);
const root = tree.getRoot().toString('hex');
const leafToProve = SHA256('c');
const proofPath = tree.getProof(leafToProve);
const belongsToTree = tree.verify(proofPath, leafToProve, root);
console.log(belongsToTree);
Save the file and execute it using the command node .. In the terminal, you will get the output true. Pass a different value to the SHA256() method for the variable leafToProve. If that value doesn’t belong to the tree, the output will be false. You have successfully implemented Merkle proof!
Summary
In this article, you learned about hash functions, Merkle tree, and Merkle proof. You also learned to implement Merkle proof in JavaScript. Merkle proof is used in peer-to-peer networks like blockchain. To learn more about implementing Merkle proof in Solidity, check out this article.