With the chagnges in the Twitter API, the steps mentioned in this article might not work as expected.
Application Programming Interface (API) allows different services to talk to each other and exchange data. Almost all services and platforms have APIs that enables you to integrate that service/platform in your application. If you’re interested to learn more about APIs in detail and want an overview of different types of APIs, read my blog on What are APIs and how to use them with no code.
Webhook is a type of API that sends data from one service to another when an event occurs. For example, if you successfully set up a webhook for Twitter, Twitter will send data to your endpoint for every new event. If someone likes your tweet, retweets your tweet, sends you a message, etc. Twitter will send this data to your webhook endpoint.
In this article, you will learn to configure a webhook in Twitter for your n8n workflow. Every time someone interacts with your Twitter account, the n8n workflow will get triggered.
Prerequisites
Twitter Developer Account
If you don’t have an account on Twitter, go ahead and sign up for one. Once you have an account, apply for the Twitter Developer Account by following the steps mentioned in this documentation. Copy the API Key, API Key Secret, and the Bearer Token.
NOTE: The approval for the Twitter Developer account might take time. It might also happen that your application gets rejected. In my experience, sharing all the details and being honest in the application raises your chances of getting approval.
n8n
You can either run n8n locally via npm or Docker, use the Desktop app, self-host n8n on your server, or sign-up for n8n.cloud. If you’re running n8n locally, make sure you start it using the --tunnel flag. You can learn more about getting started with n8n in the Installation documentation.
Postman
Download and install Postman (or similar tool). You will need this tool to register your webhook and enable subscriptions for your Twitter account.
Configure Account Activity API / Sandbox dev environment
To configure webhook in Twitter, you need to create a Twitter app. You also need access to Premium API to use the Account Activity API. Using the Account Activity API, you will be able to configure your webhook. In this step, you will learn to configure the Account Activity API sandbox.
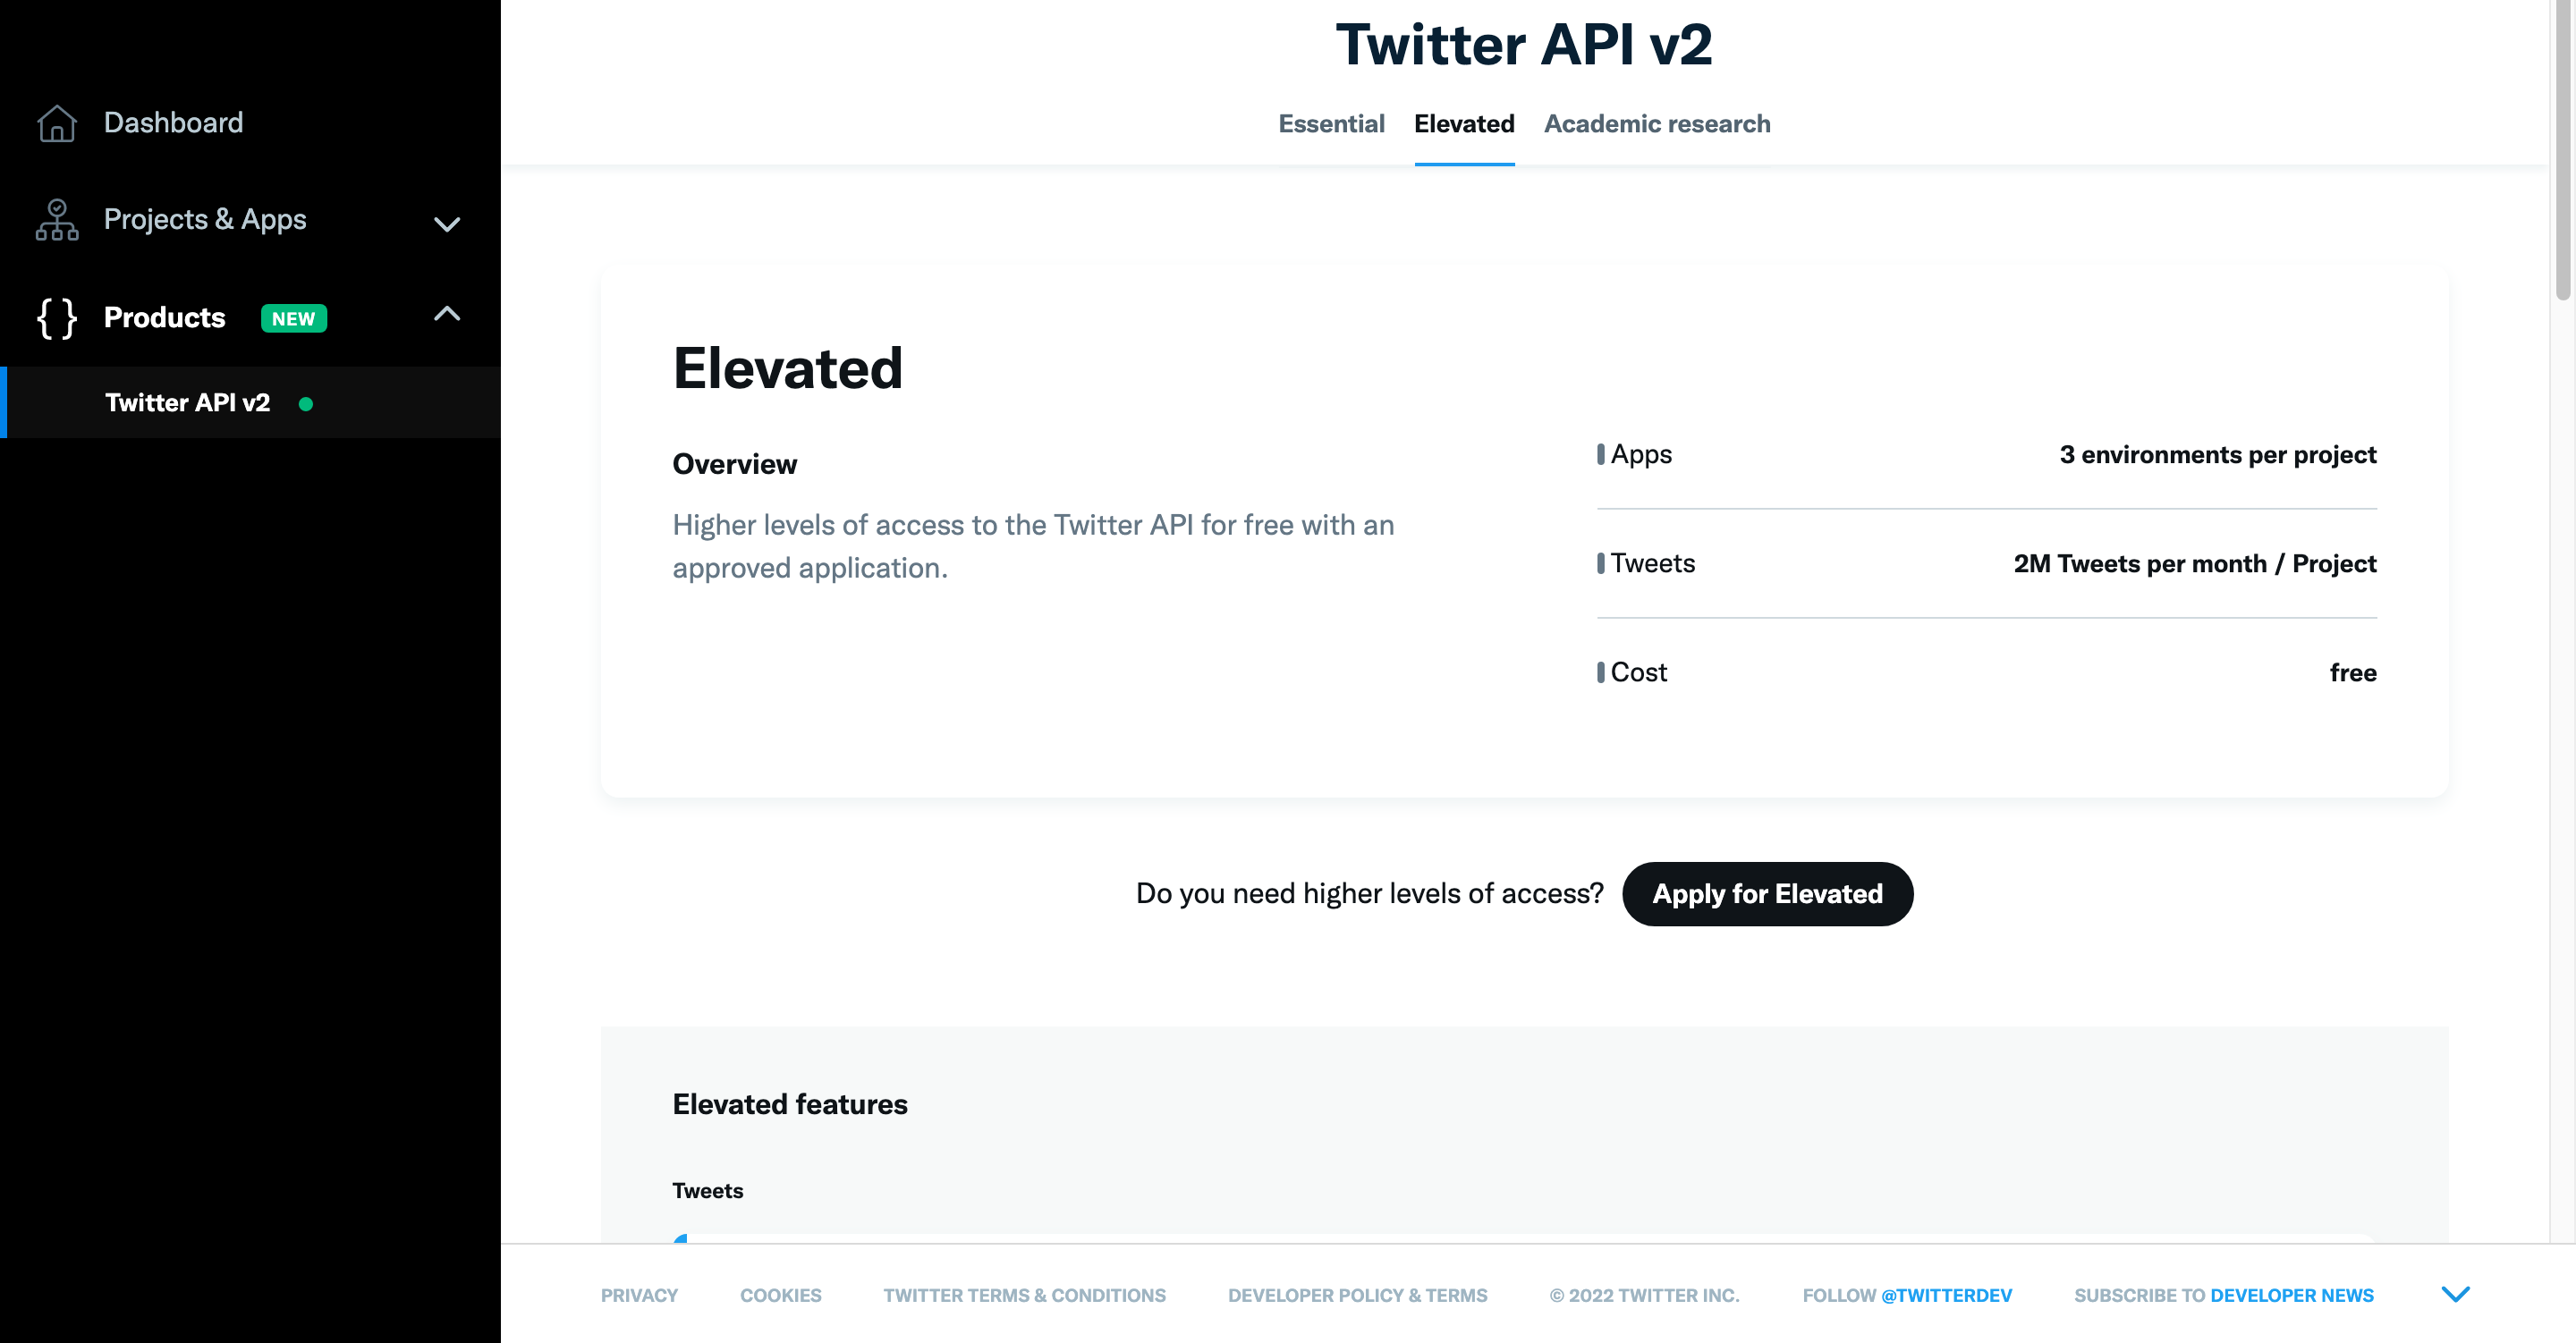
To access the Account Activity API, you need Elevated access to the Twitter API. Log in to your Twitter Developer dashboard and select Twitter API v2 under the Products dropdown list on the left sidebar.
Click on the Elevated tab and click on the Apply for Elevated button to apply for the Elevated access. Complete the application process. After the review, you will get notified via email.
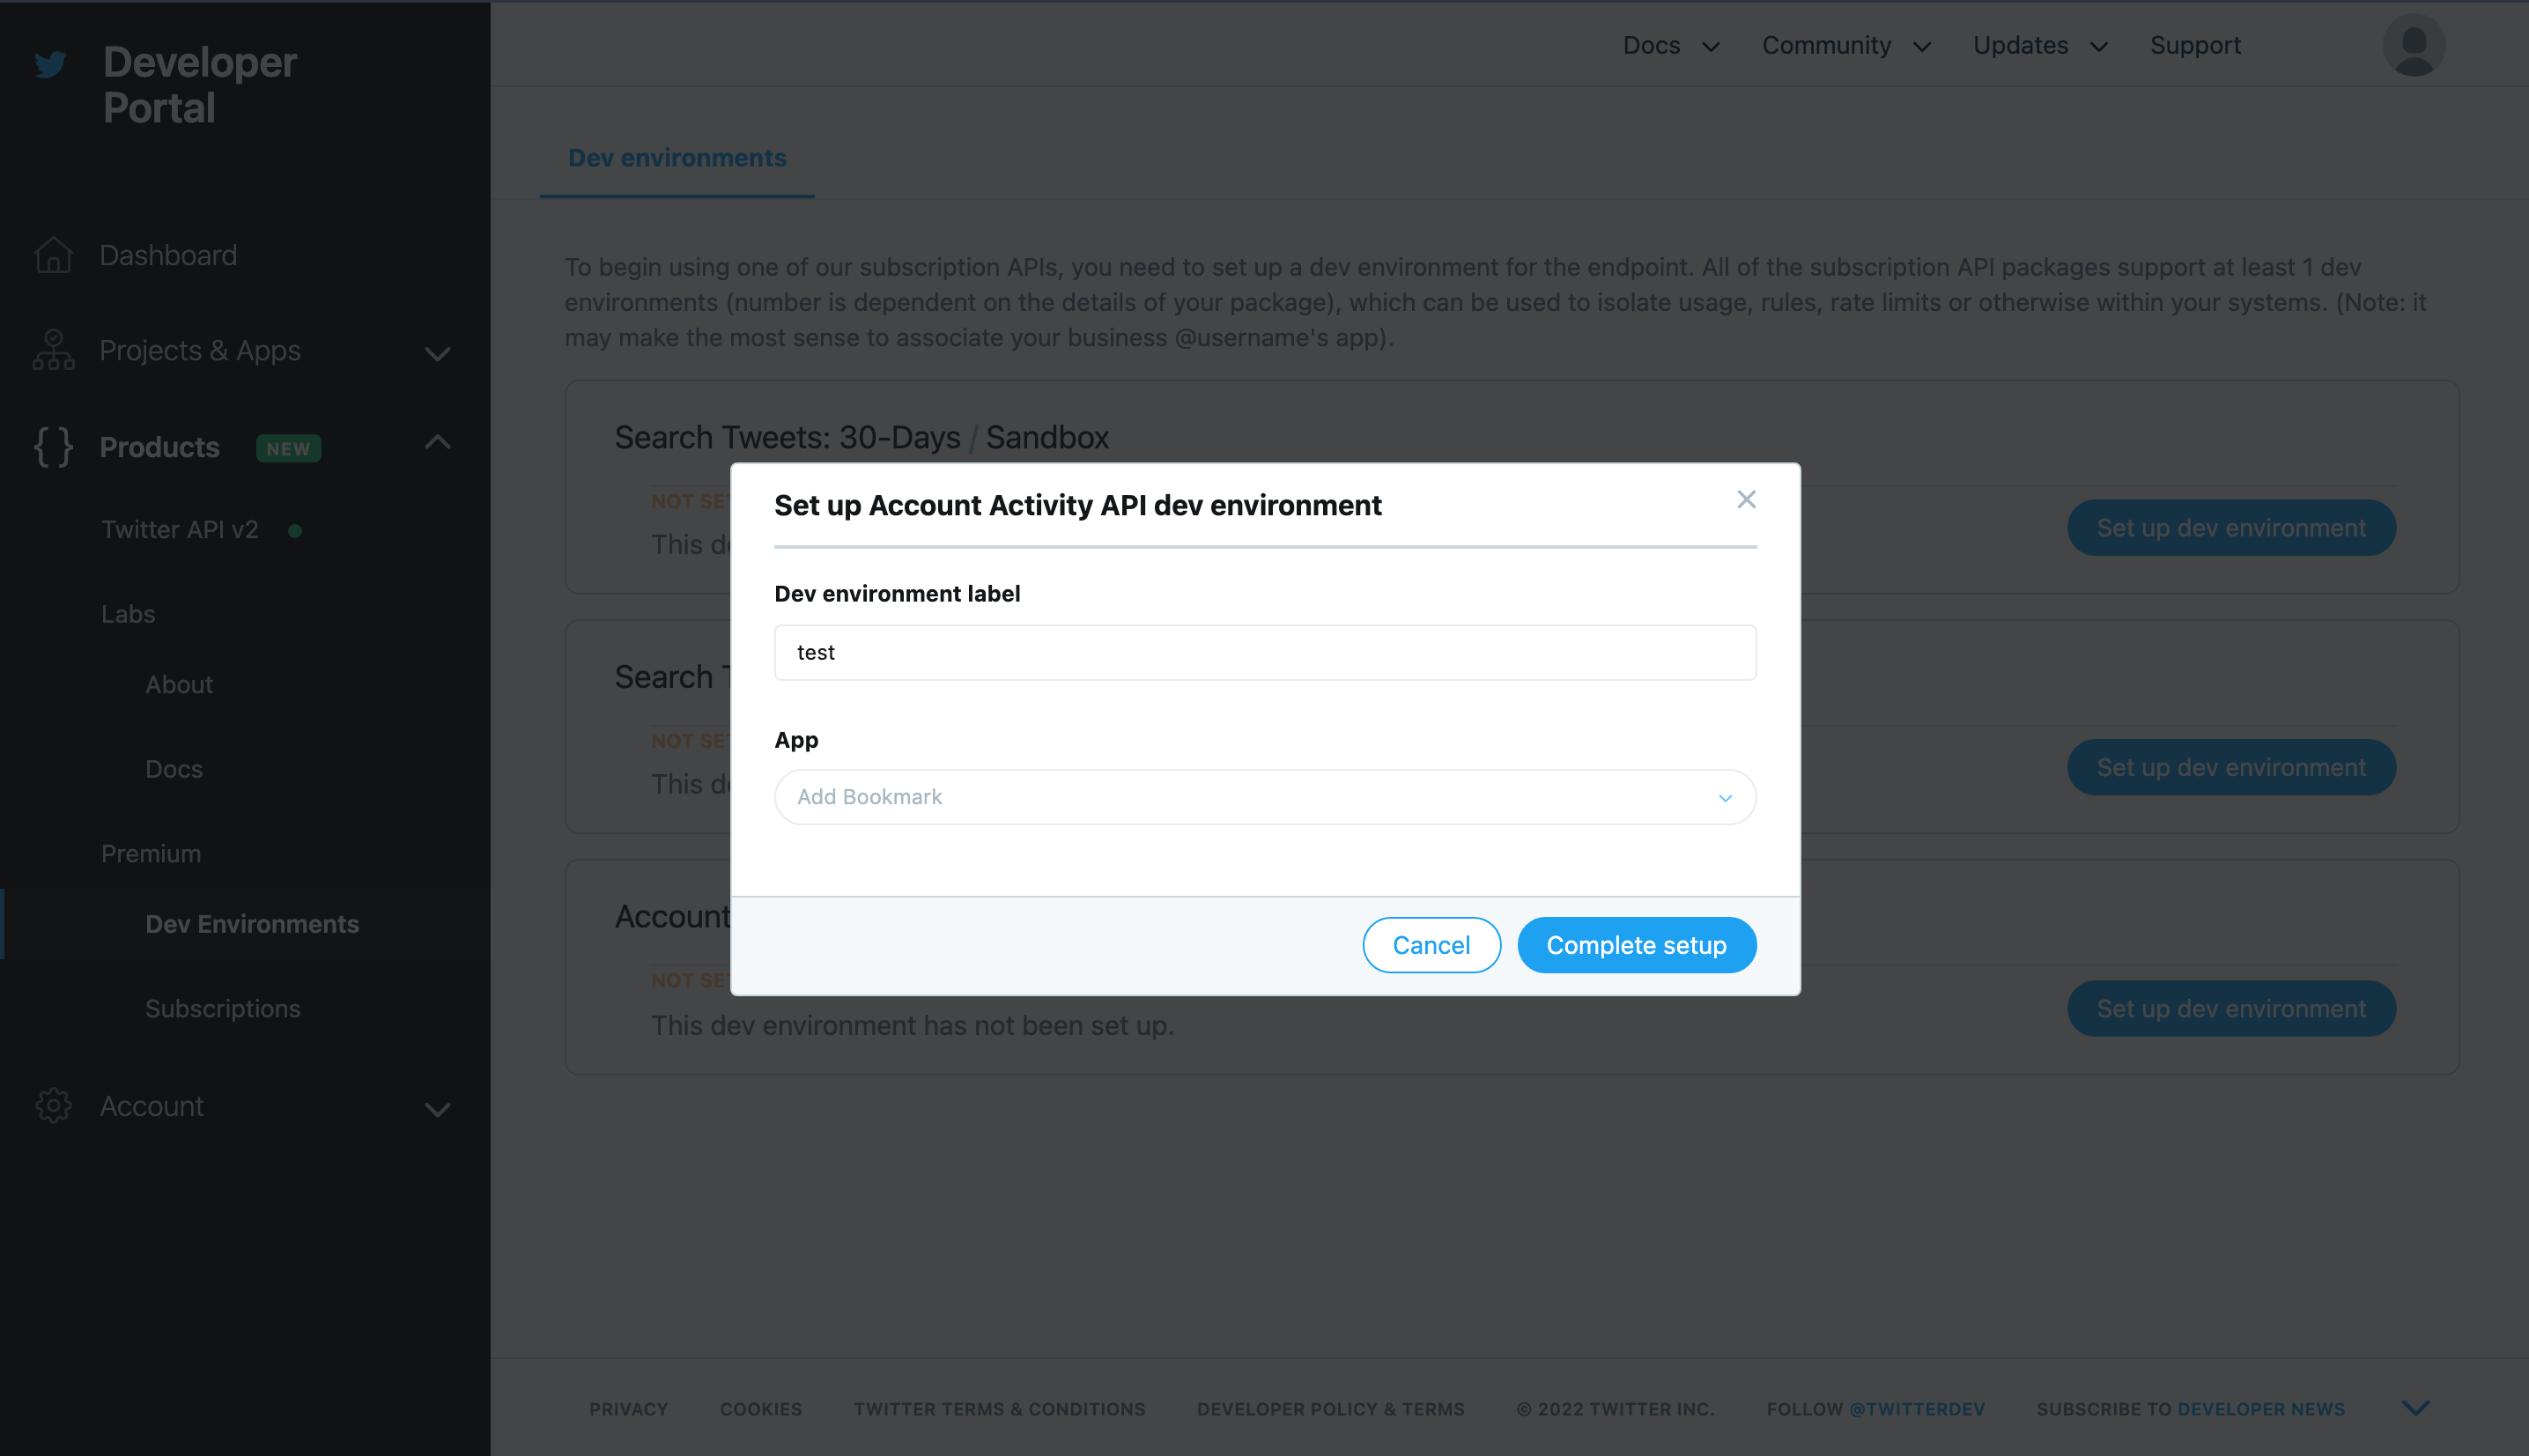
Once you have the Elevated Access, you will get access to Dev Environments. In the left sidebar, navigate to Products > Premium > Dev Environments.
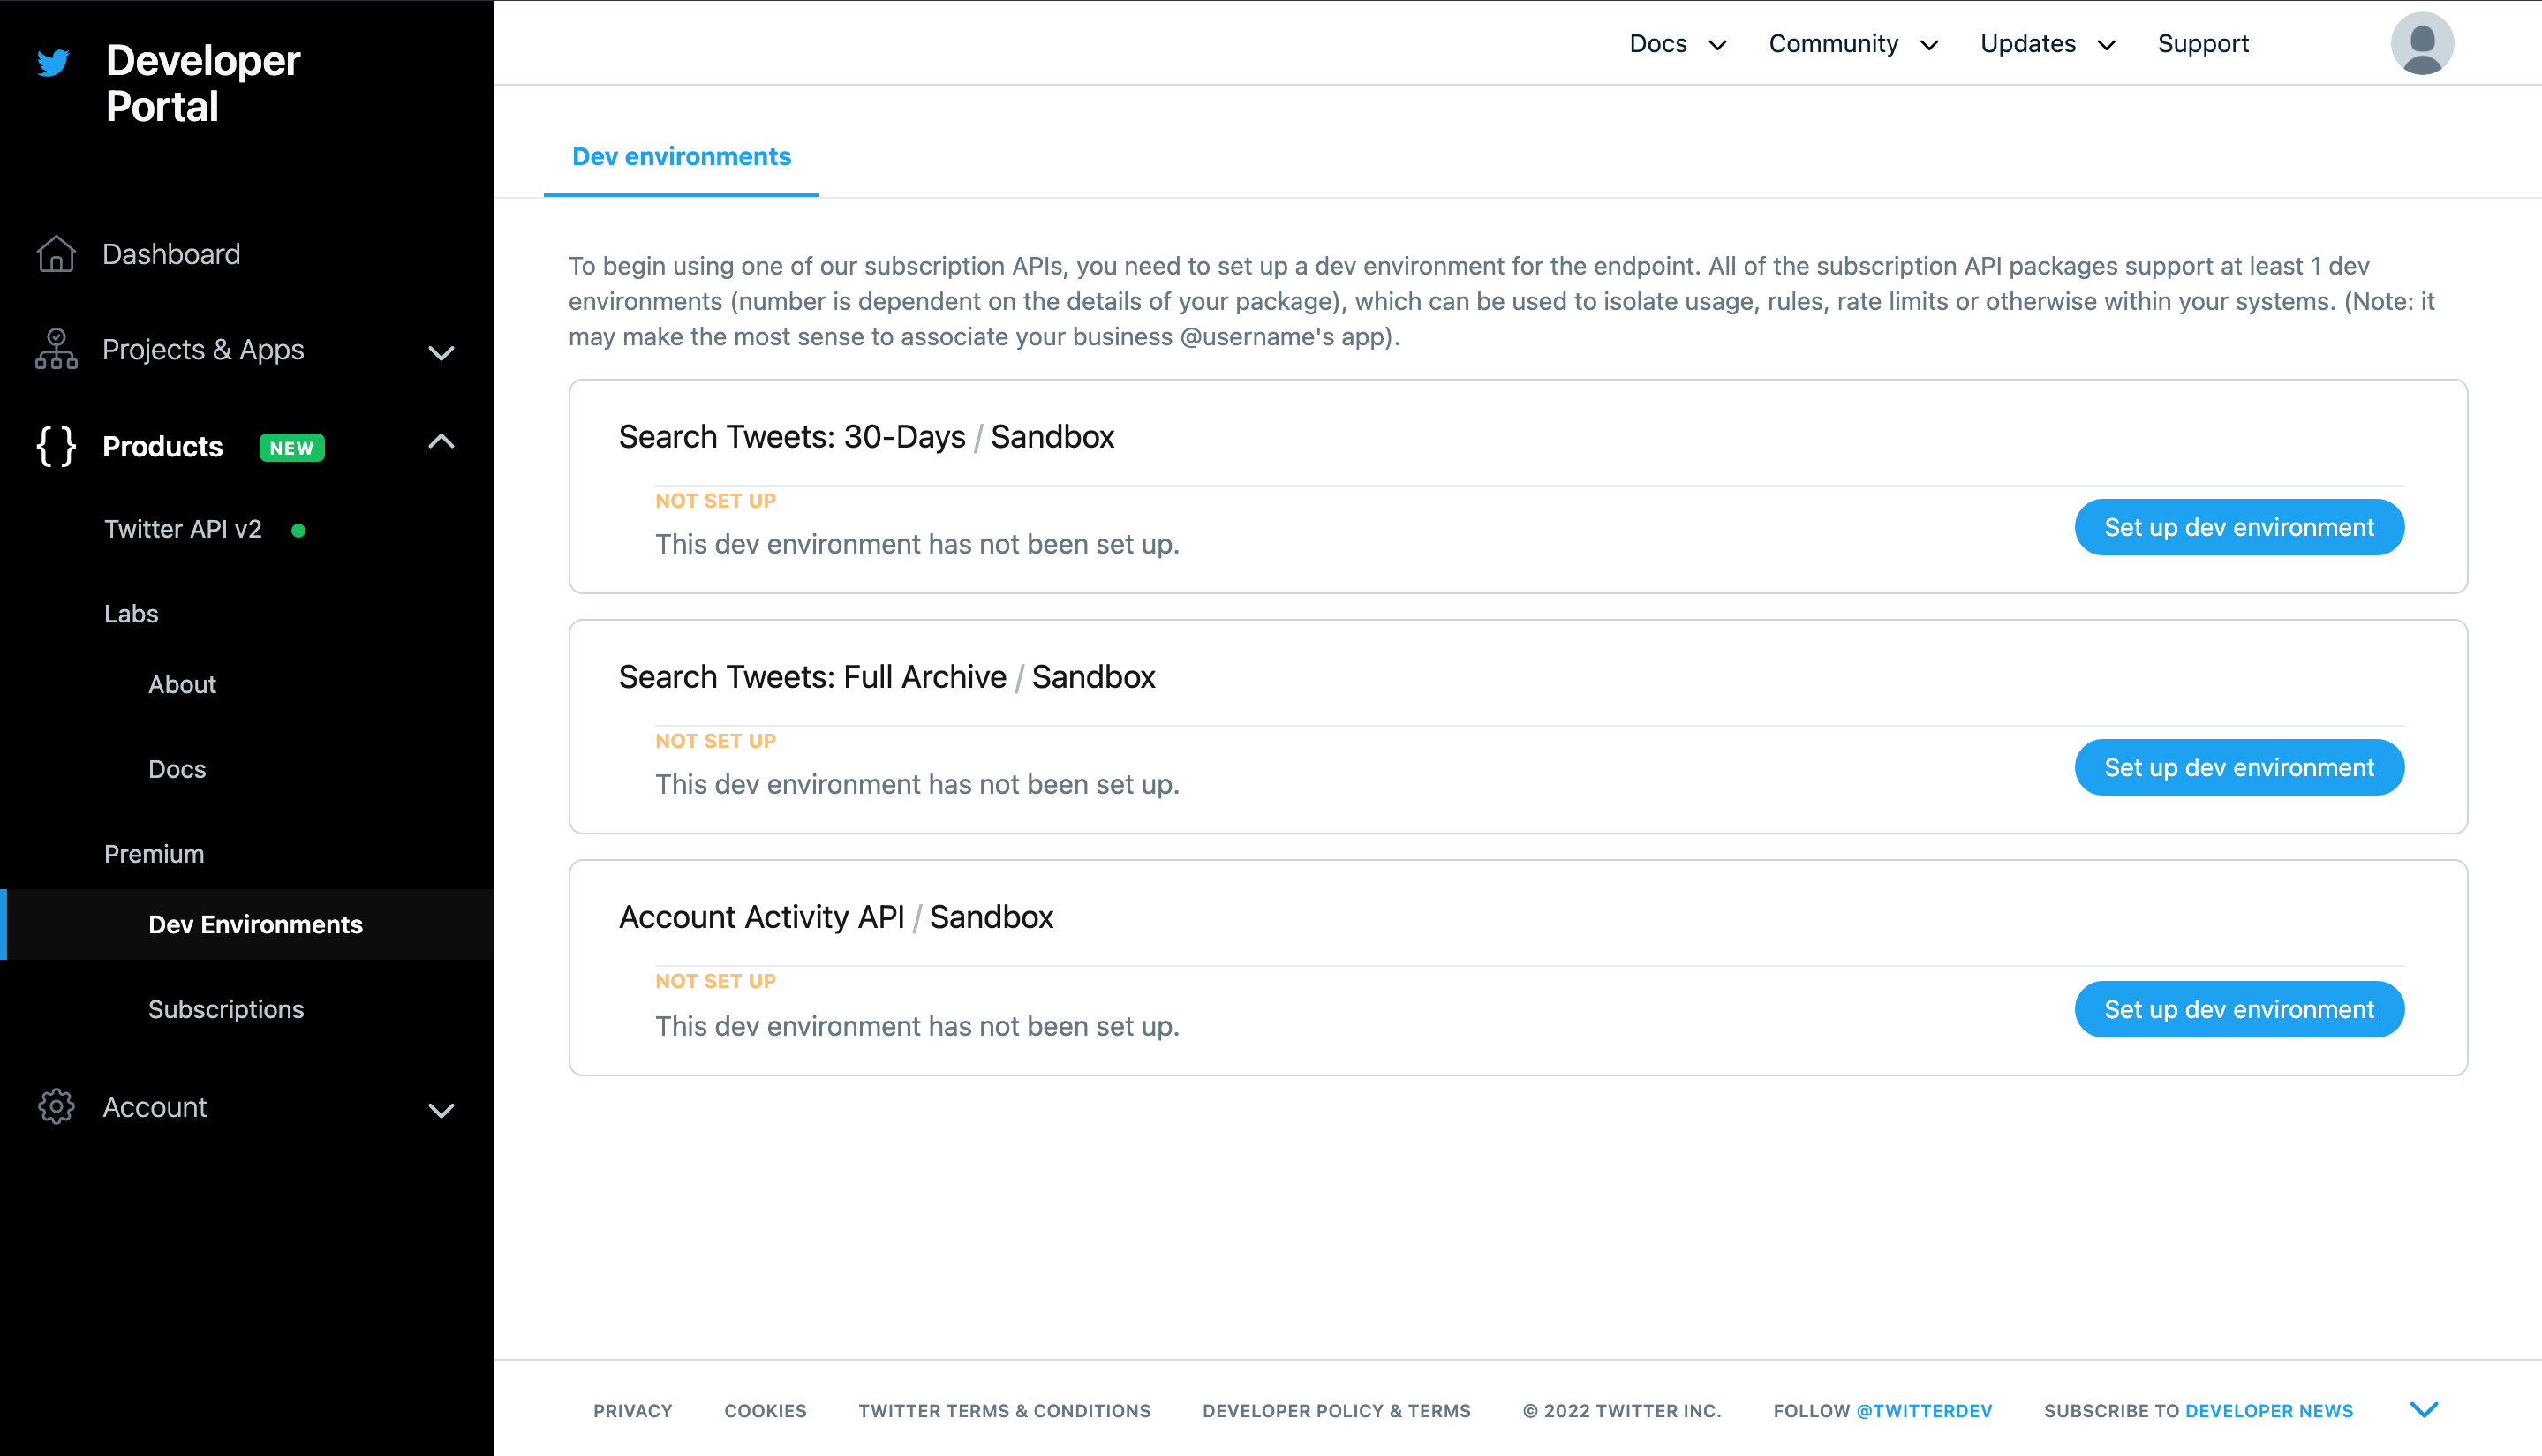
Click on the Set up dev environment button in the Account Activity API / Sandbox section. In the Dev environment label field, enter the name for your environment. You will need this dev environment label when registering the webhook URL. Select your app from the App dropdown list, and click on the Complete setup button.
You have now configured the Account Activity API. This enables you to query the Account Activity API. In the next step, you will generate the required credentials.
Configure Authentication Credentials
Now that you have access to the Account Activity API, you will use Postman to configure your n8n webhook URL. To make a successful call, you need your Twitter App credentials. In this step, you will enable the OAuth1.0a authentication method. You will also generate an access token and a secret.
On the left sidebar of the Twitter Developer Portal, select Projects & Apps > PROJECT NAME > APP NAME, where PROJECT NAME and APP NAME will be the name you gave to your project and app, respectively.
In the Settings tab, scroll down to the User authentication settings section and click on the Set up button. Toggle OAuth 1.0a to true. You can also enable OAuth 2.0. However, for this use case, OAuth2.0 is not required.
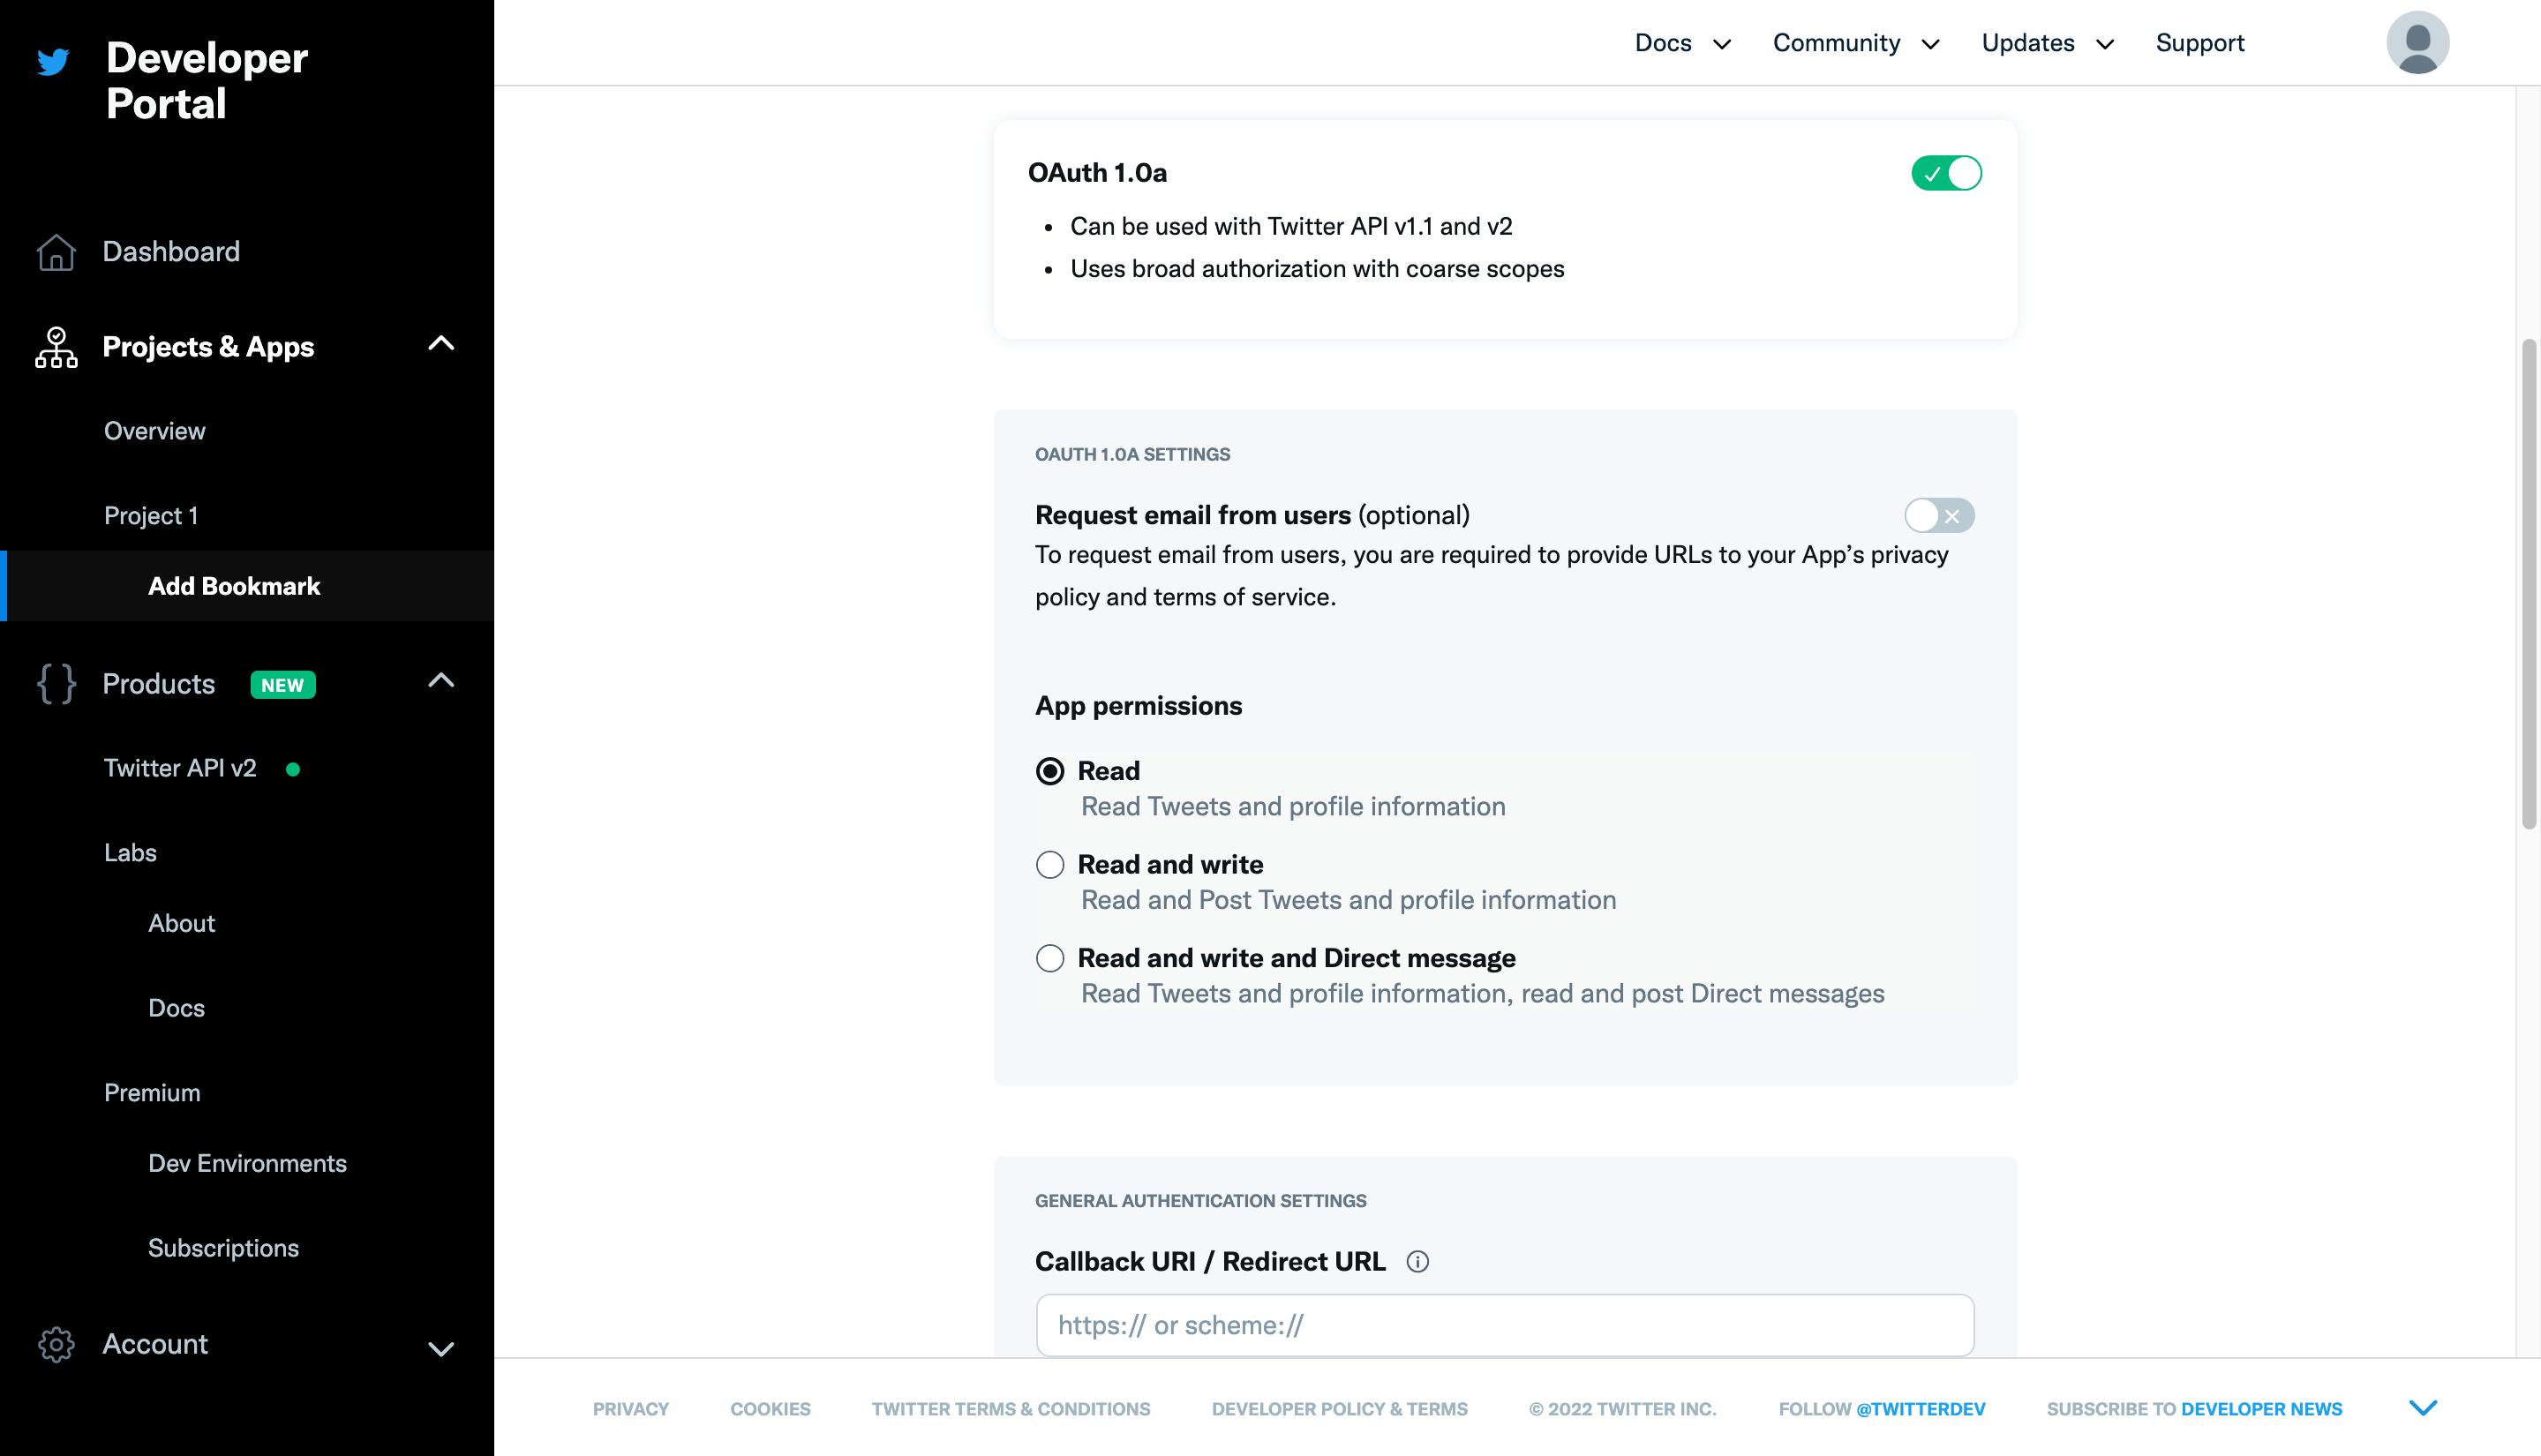
In the OAUTH 1.0A SETTINGS section, select Read and write and Direct message for the App permissions.
Under the GENERAL AUTHENTICATION SETTINGS section, enter a callback URI in the Callback URI / Redirect URL field. Enter your website URL in the Website URL field.
NOTE: If you’re building an app that allows others to authenticate, enter a valid callback URI.
Click on the Save button to save the configurations.
Now that you have OAuth1.0 enabled, you need to generate Access Token and Secret. From your App dashboard, click on the Keys and tokens tab. Under the Authentication Tokens section, click on the Generate button to generate Access Token and Secret.
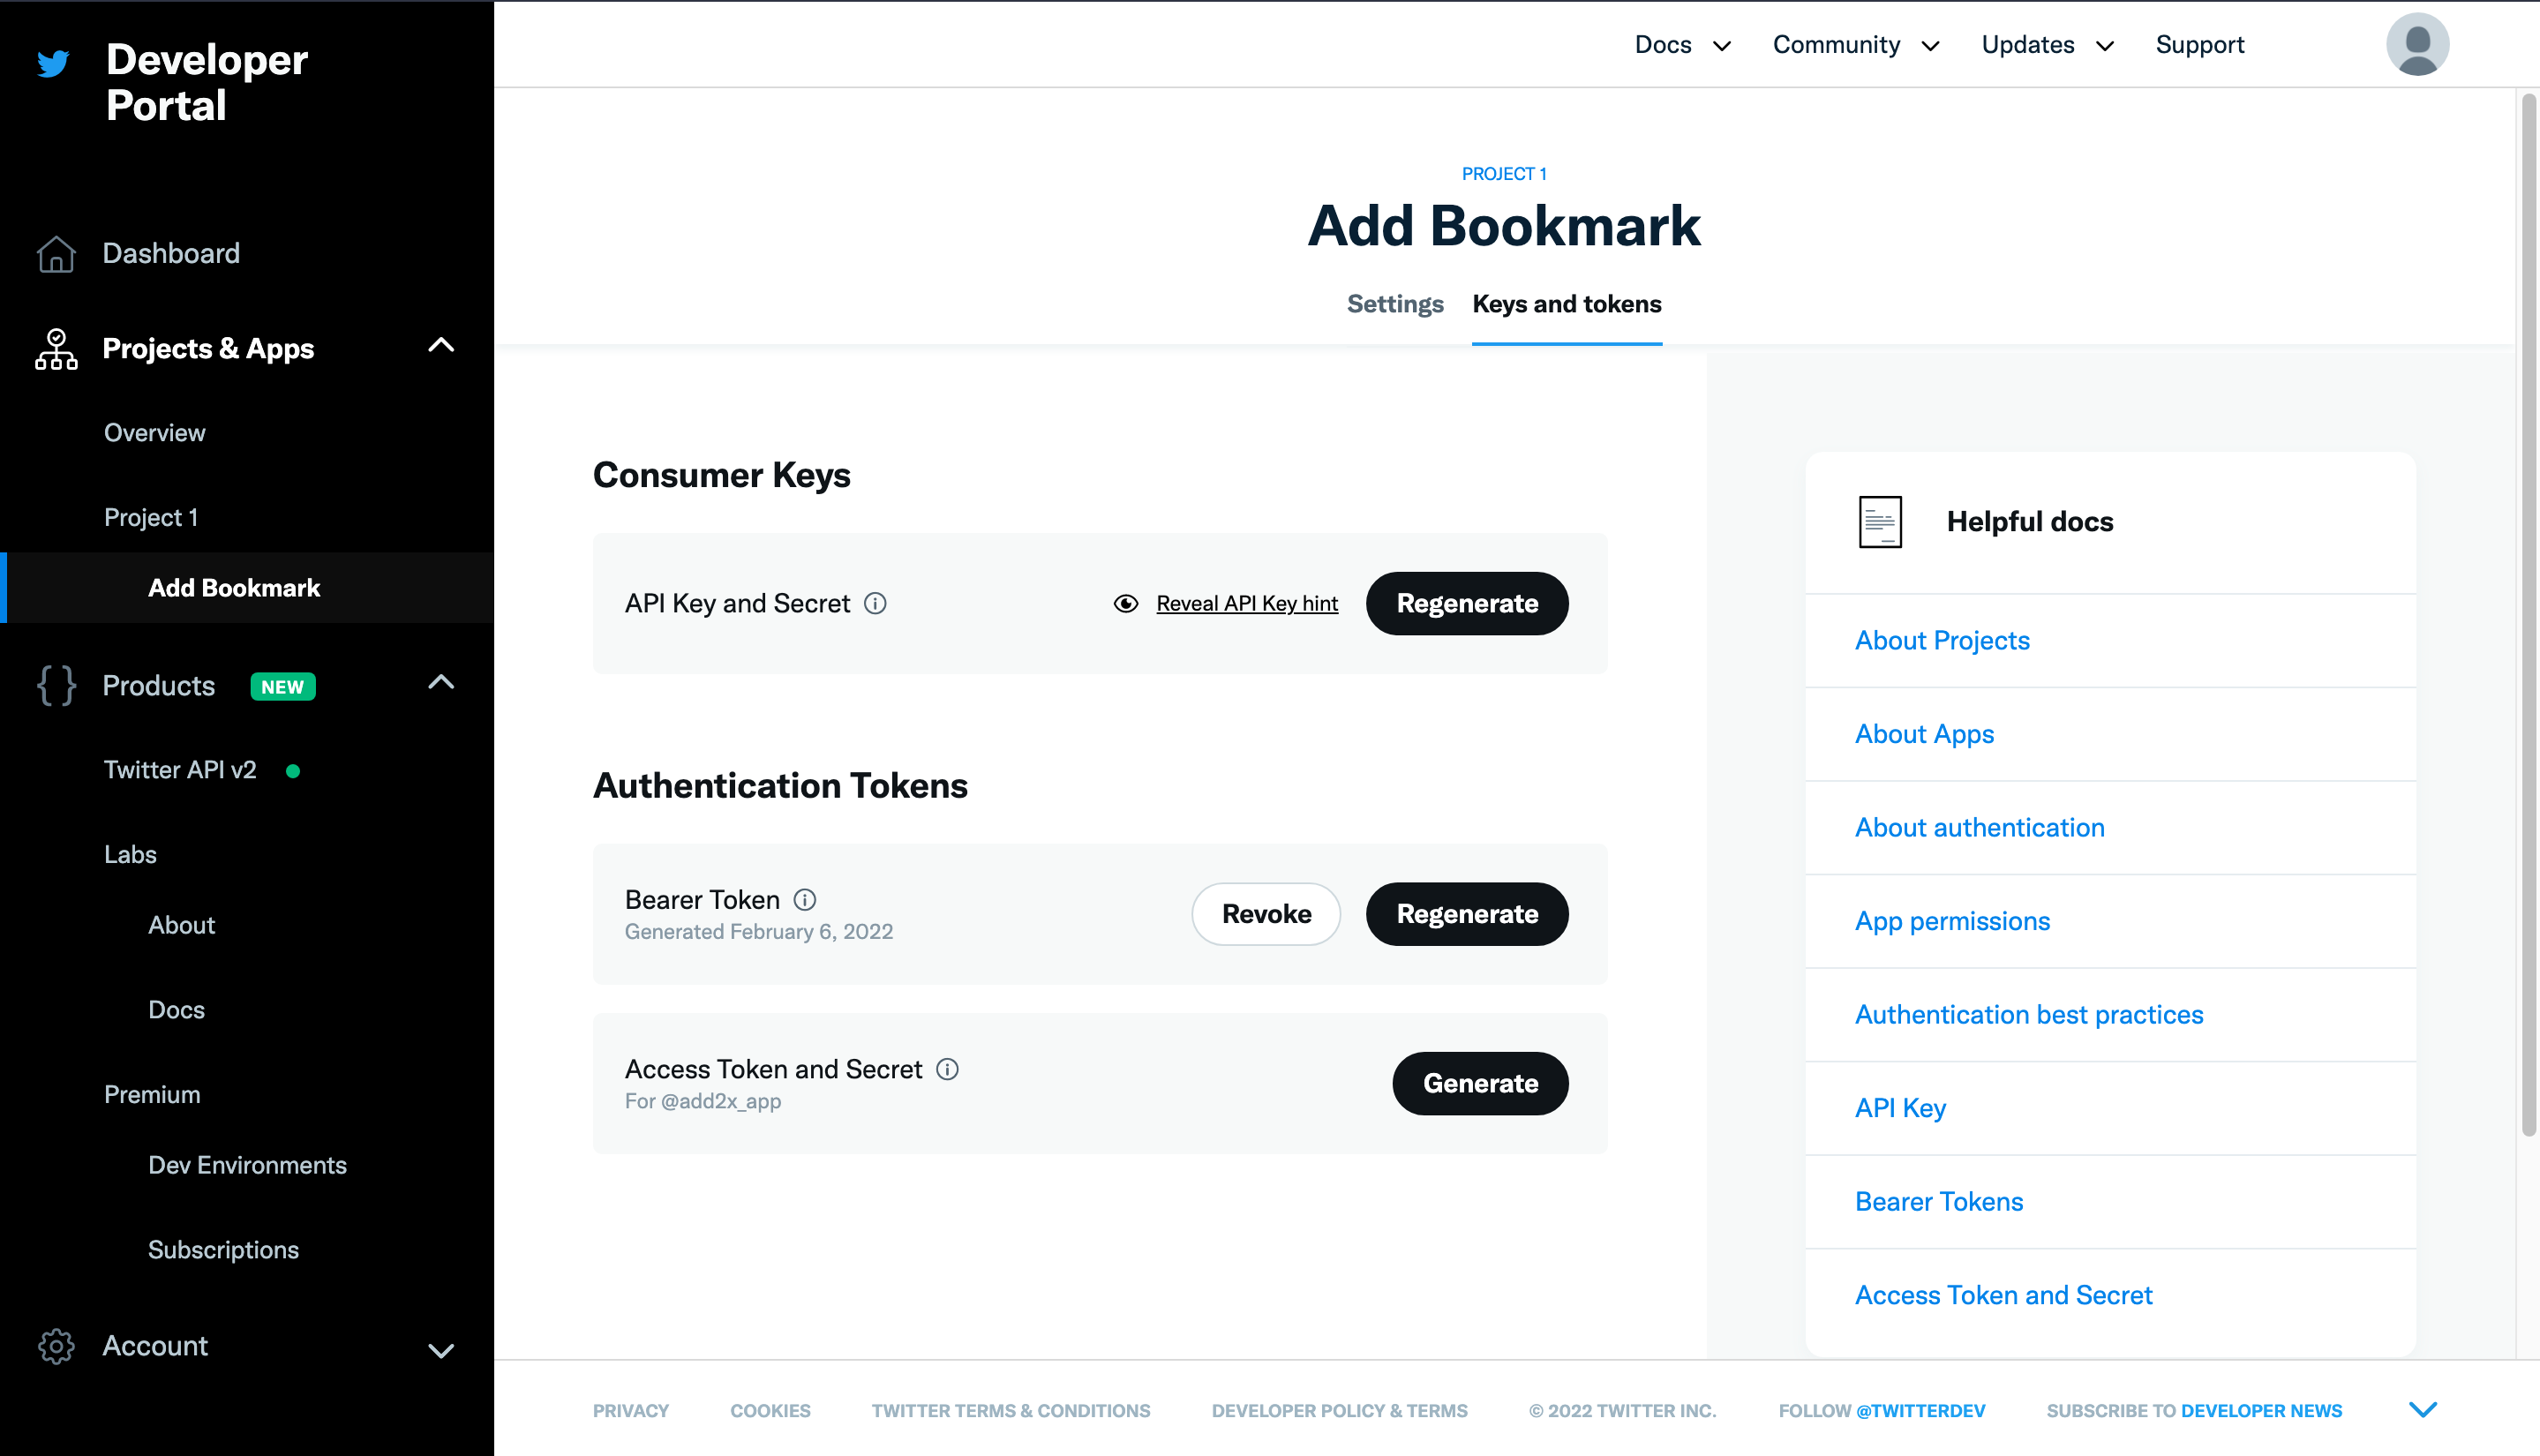
Copy the displayed Access Token and Secret. You will need them later in this tutorial.
Create a verification workflow
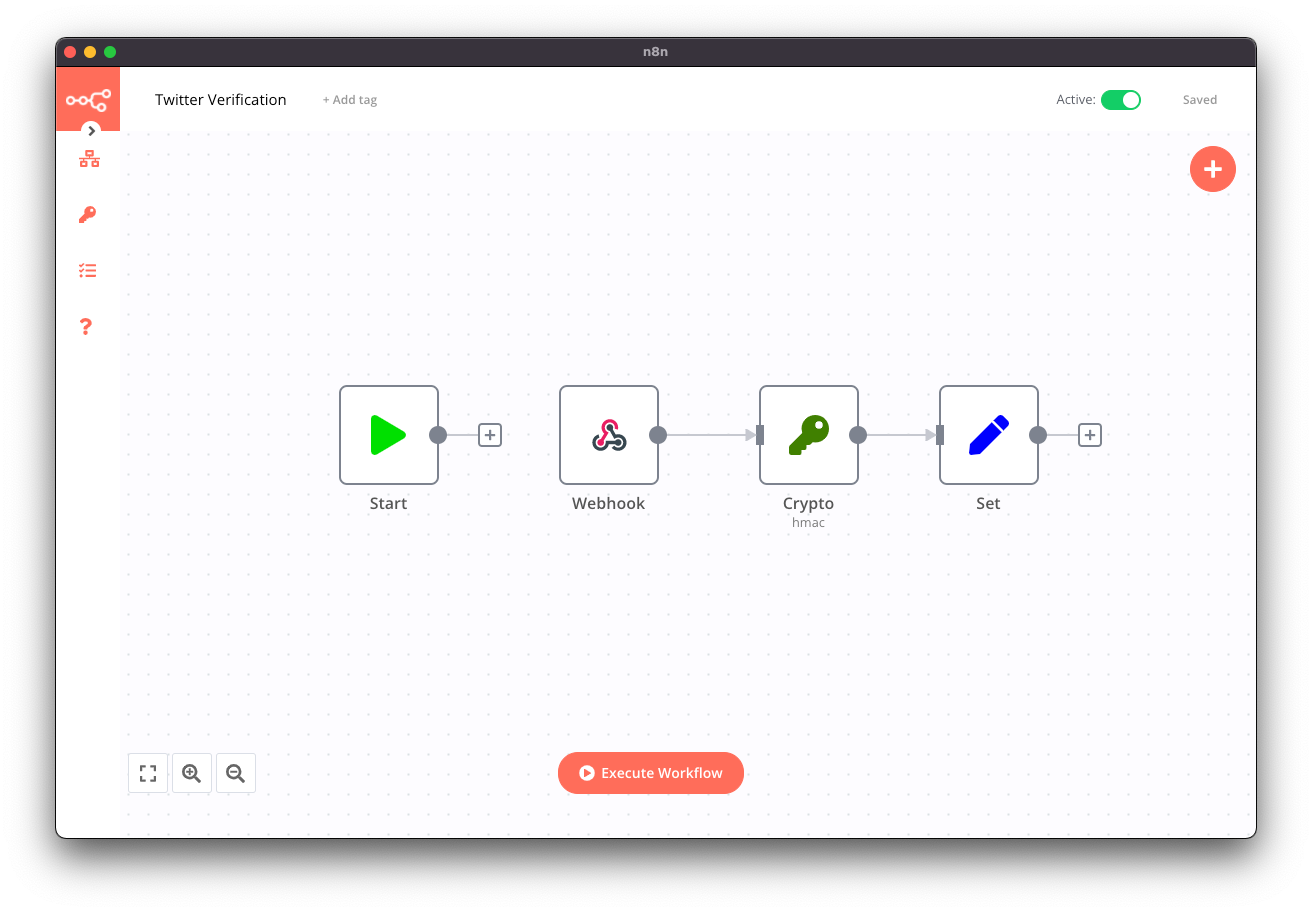
For security, Twitter verifies the webhook URL on registration. To ensure that the webhook URL is active and secure, Twitter would randomly ping the URL expecting a signature as a response. To handle this verification, you will design a workflow using the Webhook node, Crypto node, and the Set node.
💡 NOTE: If you don’t want to get into the details of creating the workflow, you can use the workflow from the workflow page. Save and activate the workflow.
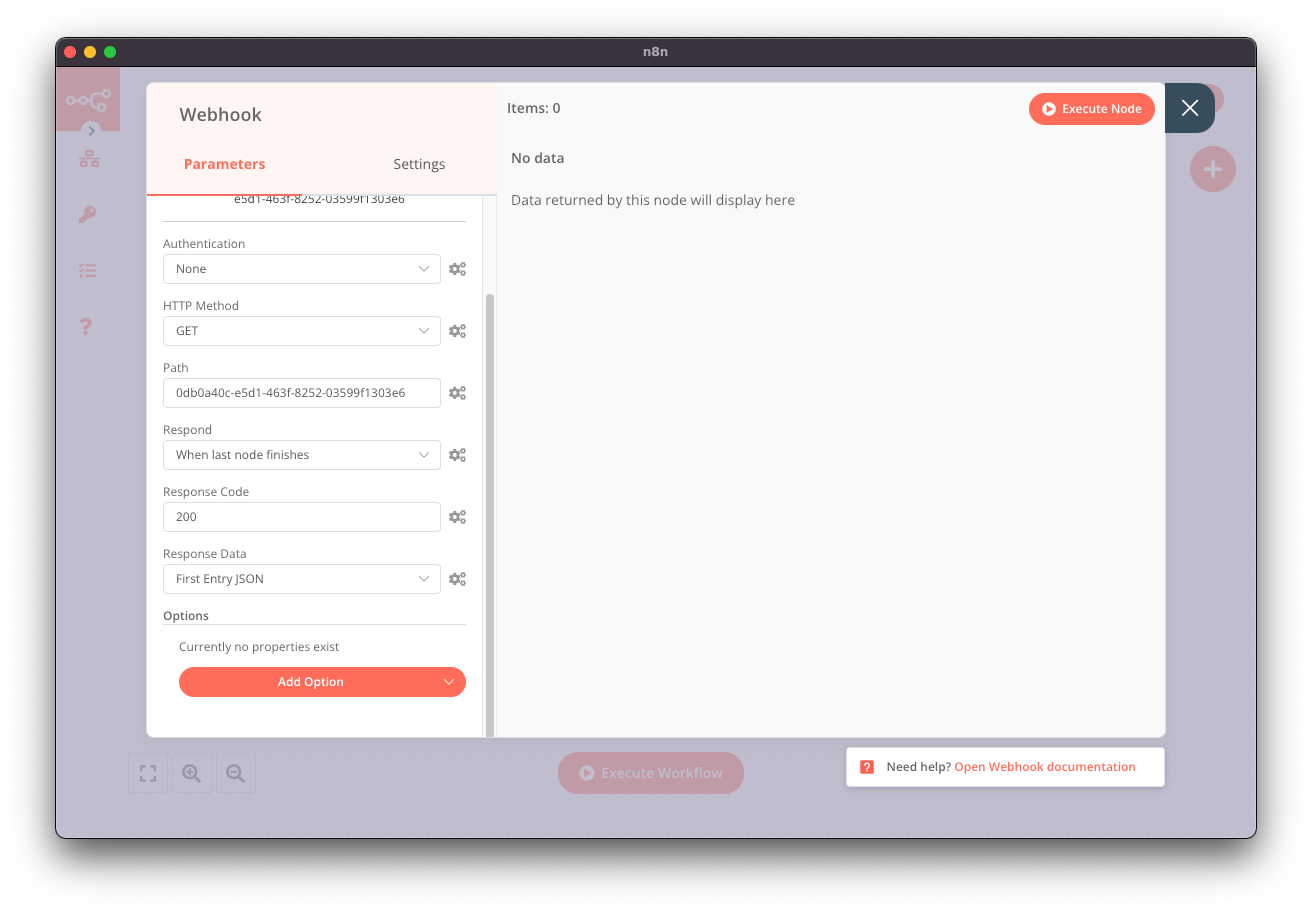
Open a new workflow canvas in n8n and click on the + button. Select the Webhook node from the nodes panel. The Webhook node should have the following configuration:
Authentication: None
HTTP Method: GET
Path: [Optional] twitter
Respond: When last node finishes
Response Code: 200
Response Data: First Entry JSON
Add a Crypto node and connect it to the Webhook node. The Crypto node will encode the CRC Token sent by Twitter. In the Crypto node, configure the following parameters:
Action: Hmac
Property Name: data
Type: SHA256
Encoding: BASE64
To reference the CRC Token from the incoming paylad, click on the gears icon next to the Value field. Select Add Expression and paste the following expression in the Expression Editor: {{$json["query"]["crc_token"]}}.
In the Secret field, paste the API Key Secret that gets displayed after creating your Twitter app.

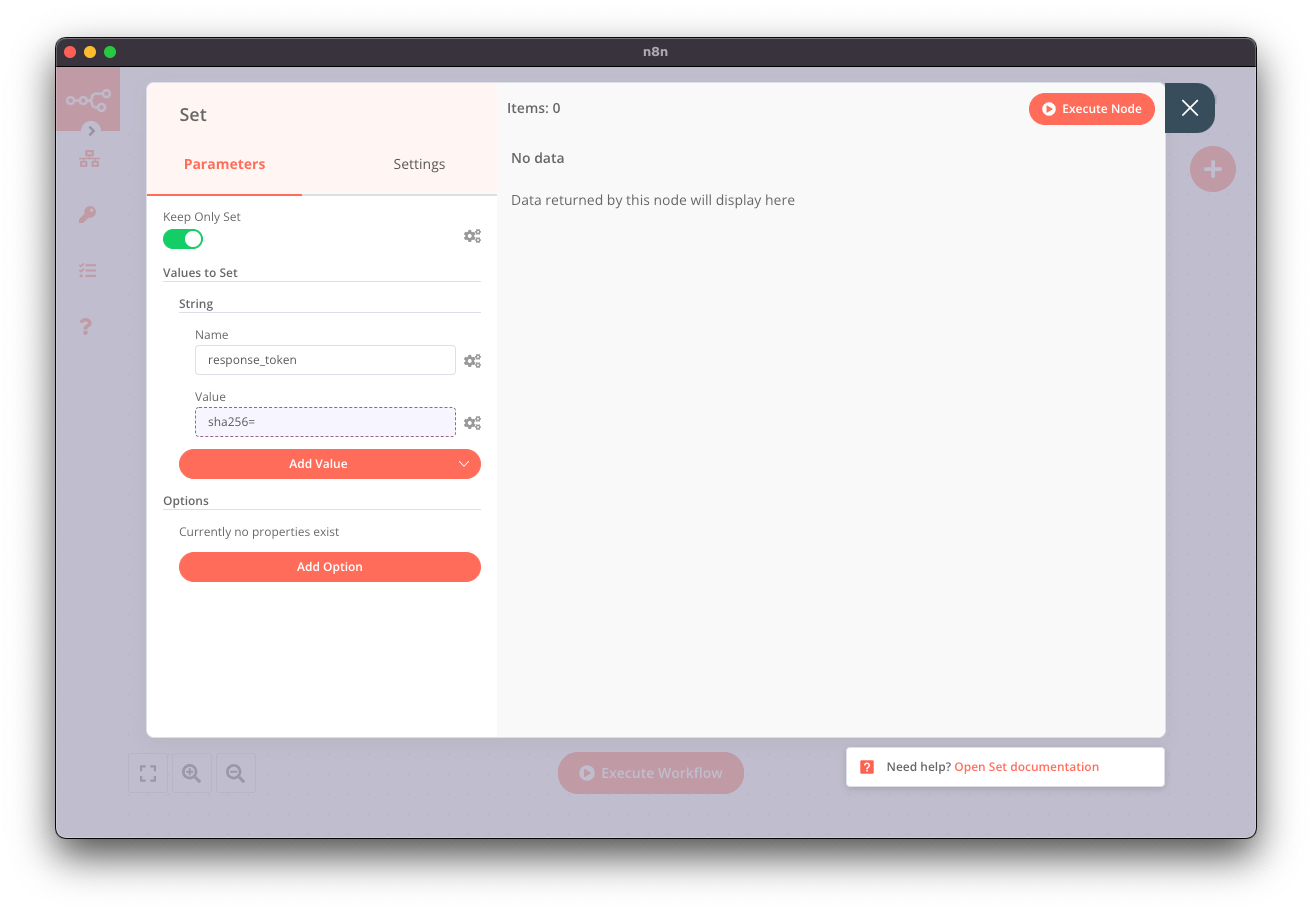
Add a Set node and connect it to the Crypto node. In the Set node, you will generate the body that the Twitter API accepts.
In the Set node, toggle Keep Only Set to true. This option will only return the data we configure in the Set node.
Click on Add Value and select String from the dropdown list. In the Name field, enter response_token. Click on the gears icon next to the Value field and select Add Expression. Paste the following in the Expression Editor:
sha256={{$json["data"]}}.
NOTE: The expressions in this workflow resolve to [not found]. This happens because there is currently no data available.
Save the workflow and toggle Active to true. Your workflow is now active.
Register Webhook
Now that you have the verification workflow, you need to register your webhook URL. In this step, you will use Postman to register the URL.
Open the Webhook node in n8n and click on the Production URL tab. Click on the URL to copy.
Open Postman and enter the following URL: https://api.twitter.com/1.1/account_activity/all/[ENV_LABEL]/webhooks.json?url=[WEBHOOK_URL]. Replace [ENV_LABEL] with the dev environment label you used when setting up the dev environment. Similarly, replace [WEBHOOK_URL] with the n8n webhook URL you copied earlier.
In Postman, click on the Authorization tab and select OAuth 1.0 from the Type dropdown list. Configure the following values for authorization:
Signature Method: HMAC-SHA1
Consumer Key: Paste your API Key from Twitter
Consumer Secret: Paste your API Key Secret from Twitter
Access Token: Paste your Access Token from Twitter
Token Secret: Paste your Token Secret from Twitter
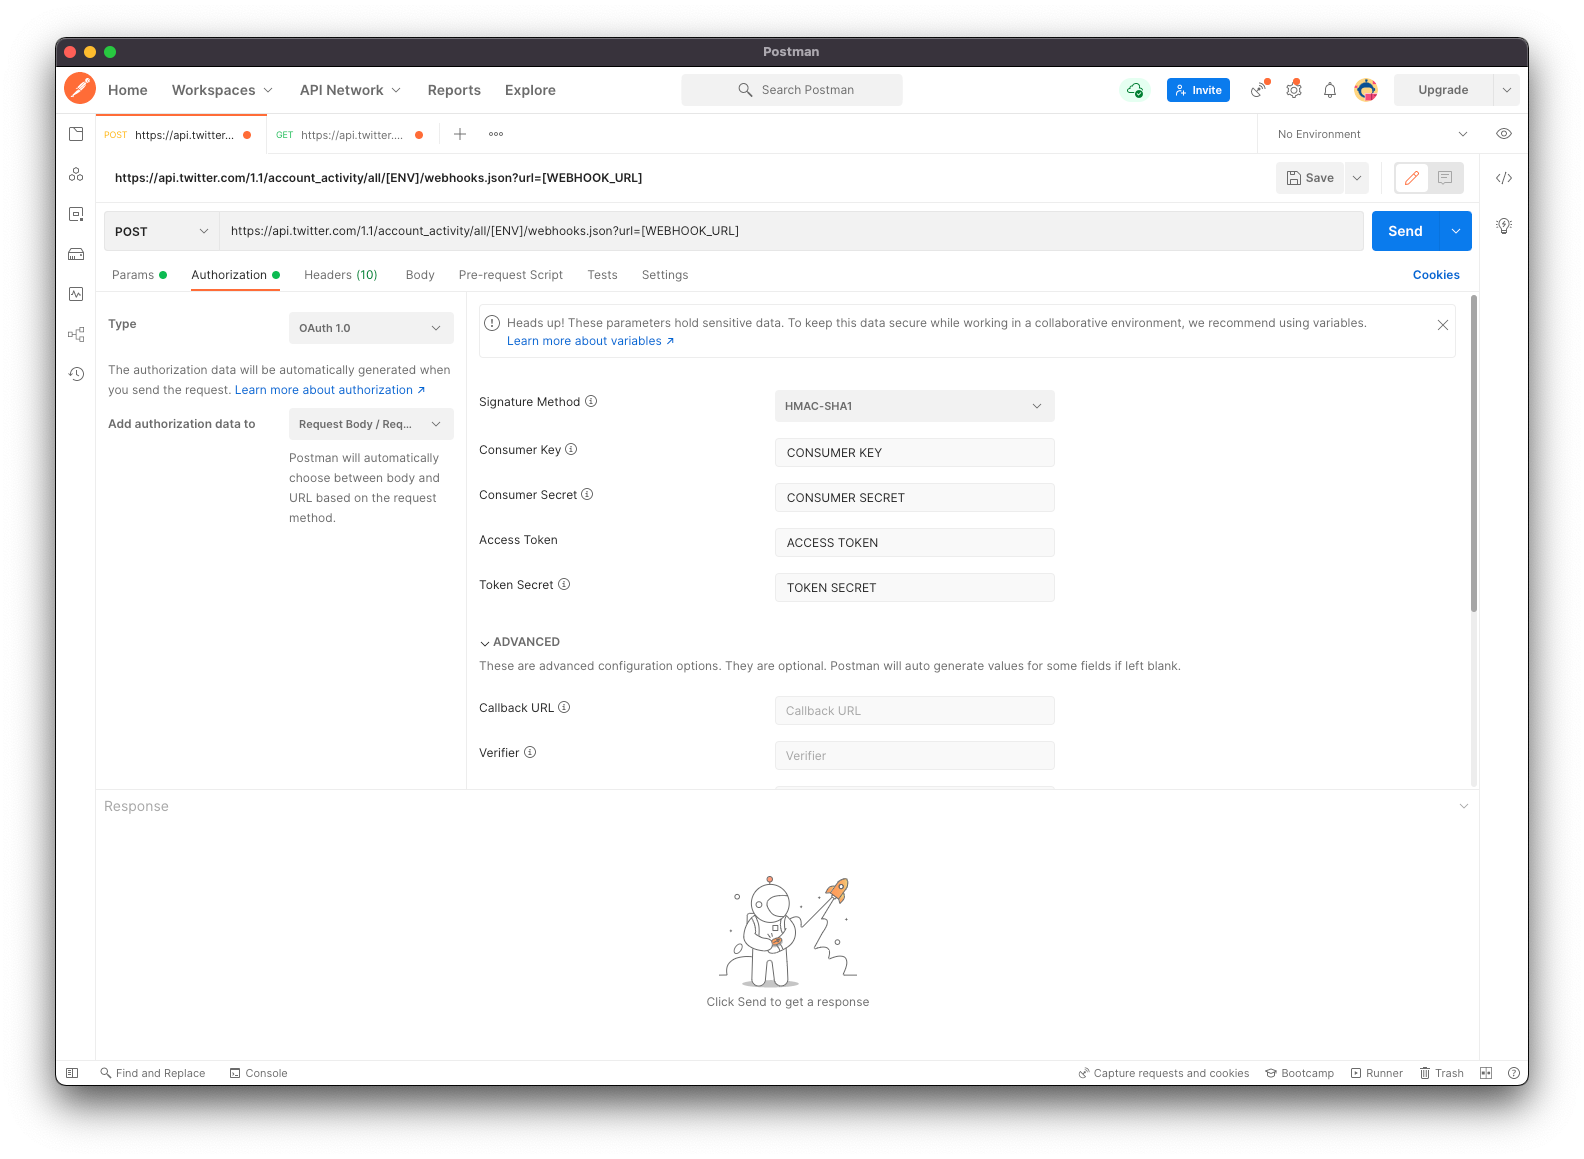
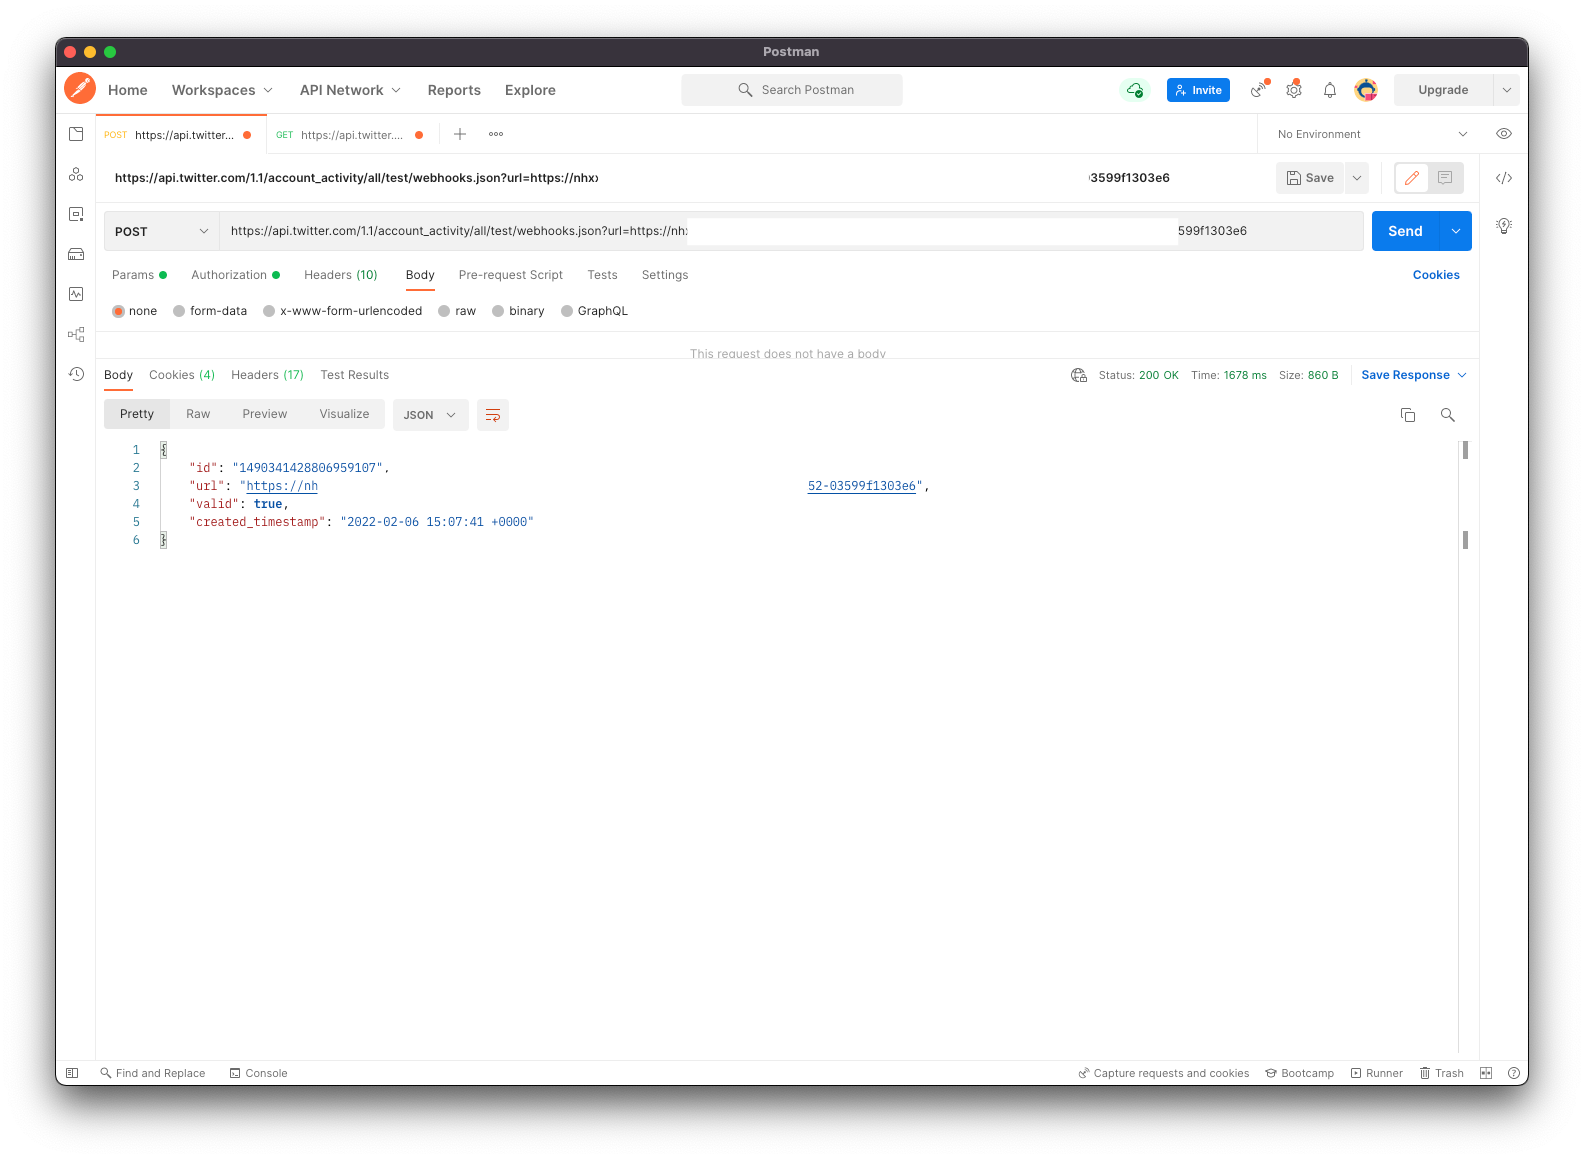
To register the webhook, you need to make a POST request. Select POST from the METHOD dropdown list. Click on Send. Twitter will send a response similar to the image below on successful registration.
You have successfully registered the webhook. However, Twitter will not send any data yet. Twitter sends the account activity data via the POST method. Hence, you will need to add a webhook with a similar URL to listen to POST requests. In the next step, you will add another webhook node in the same workflow to do just that.
Add Webhook to listen to Incoming Requests
You created a workflow that would trigger the workflow when the webhook gets called with a GET request. Twitter sends a GET request only for verification. The account activity API sends the activity payload via POST requests. In this step, you will add a Webhook node that triggers the workflow on POST requests.
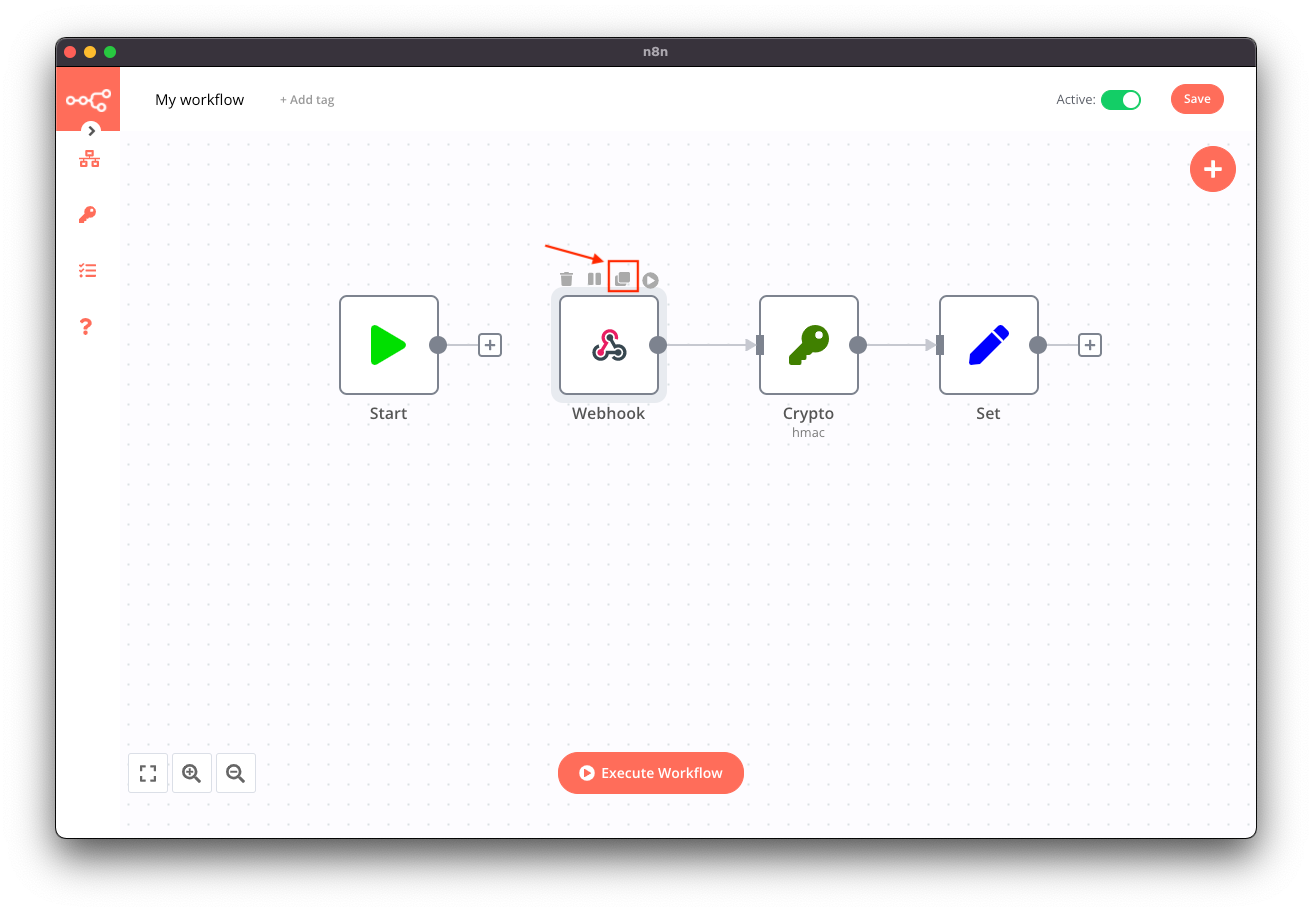
In the verification workflow, hover over the Webhook node. Select the duplicate option to duplicate the node.
Open the new Webhook node, and select POST from the HTTP Method dropdown list. Click on the Save button to save the workflow and register the new webhook.
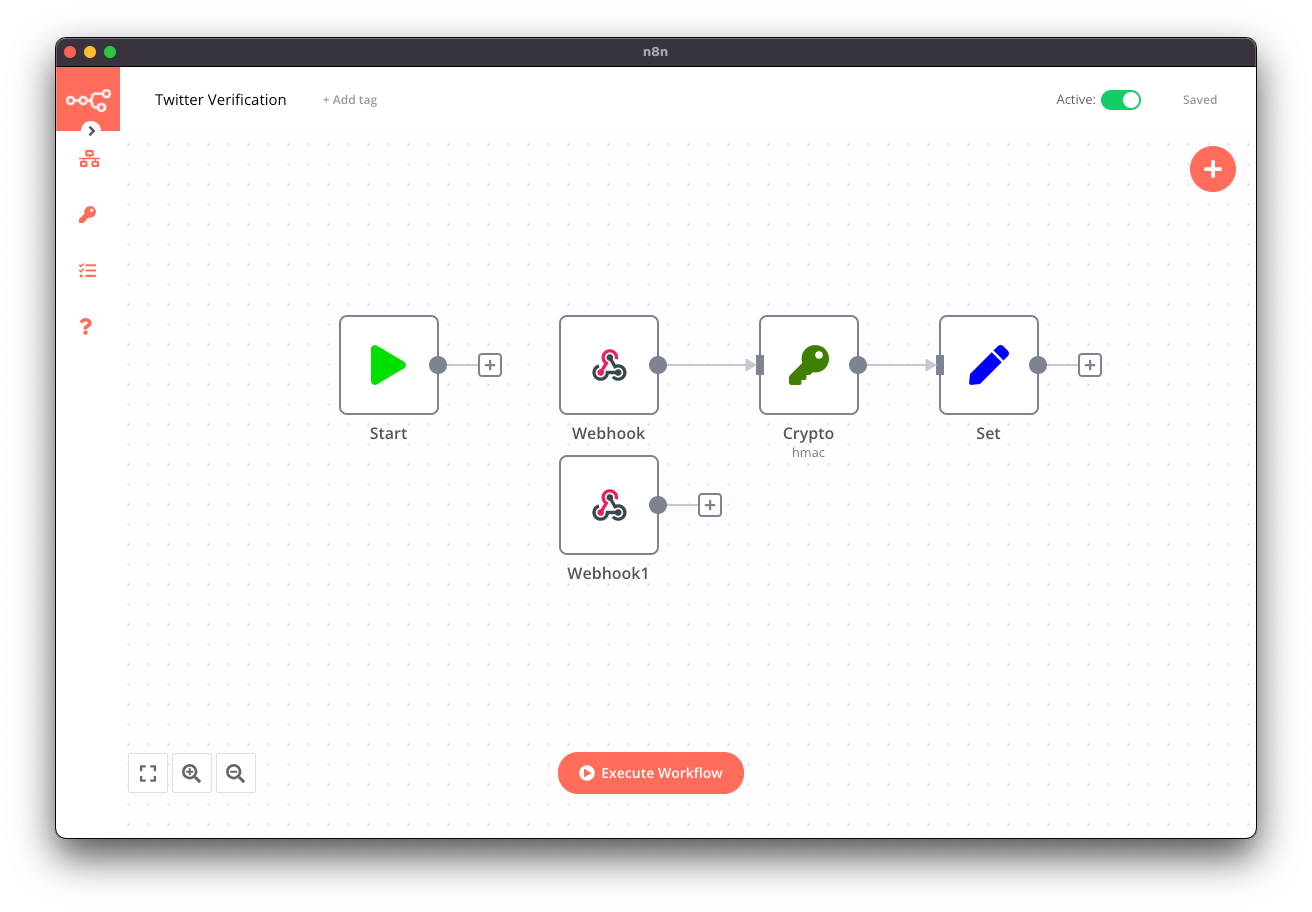
You now have a workflow with two Webhook nodes. The first Webhook node handles the verification, while the second Webhook gets triggered when new account activity occurs. You have to create a subscription for a user, which you will do in the next step.
Create subscription
In the free tier, subscriptions are limited to a maximum of 15 unique users per application. In this step, you will learn to create a subscription for yourself.
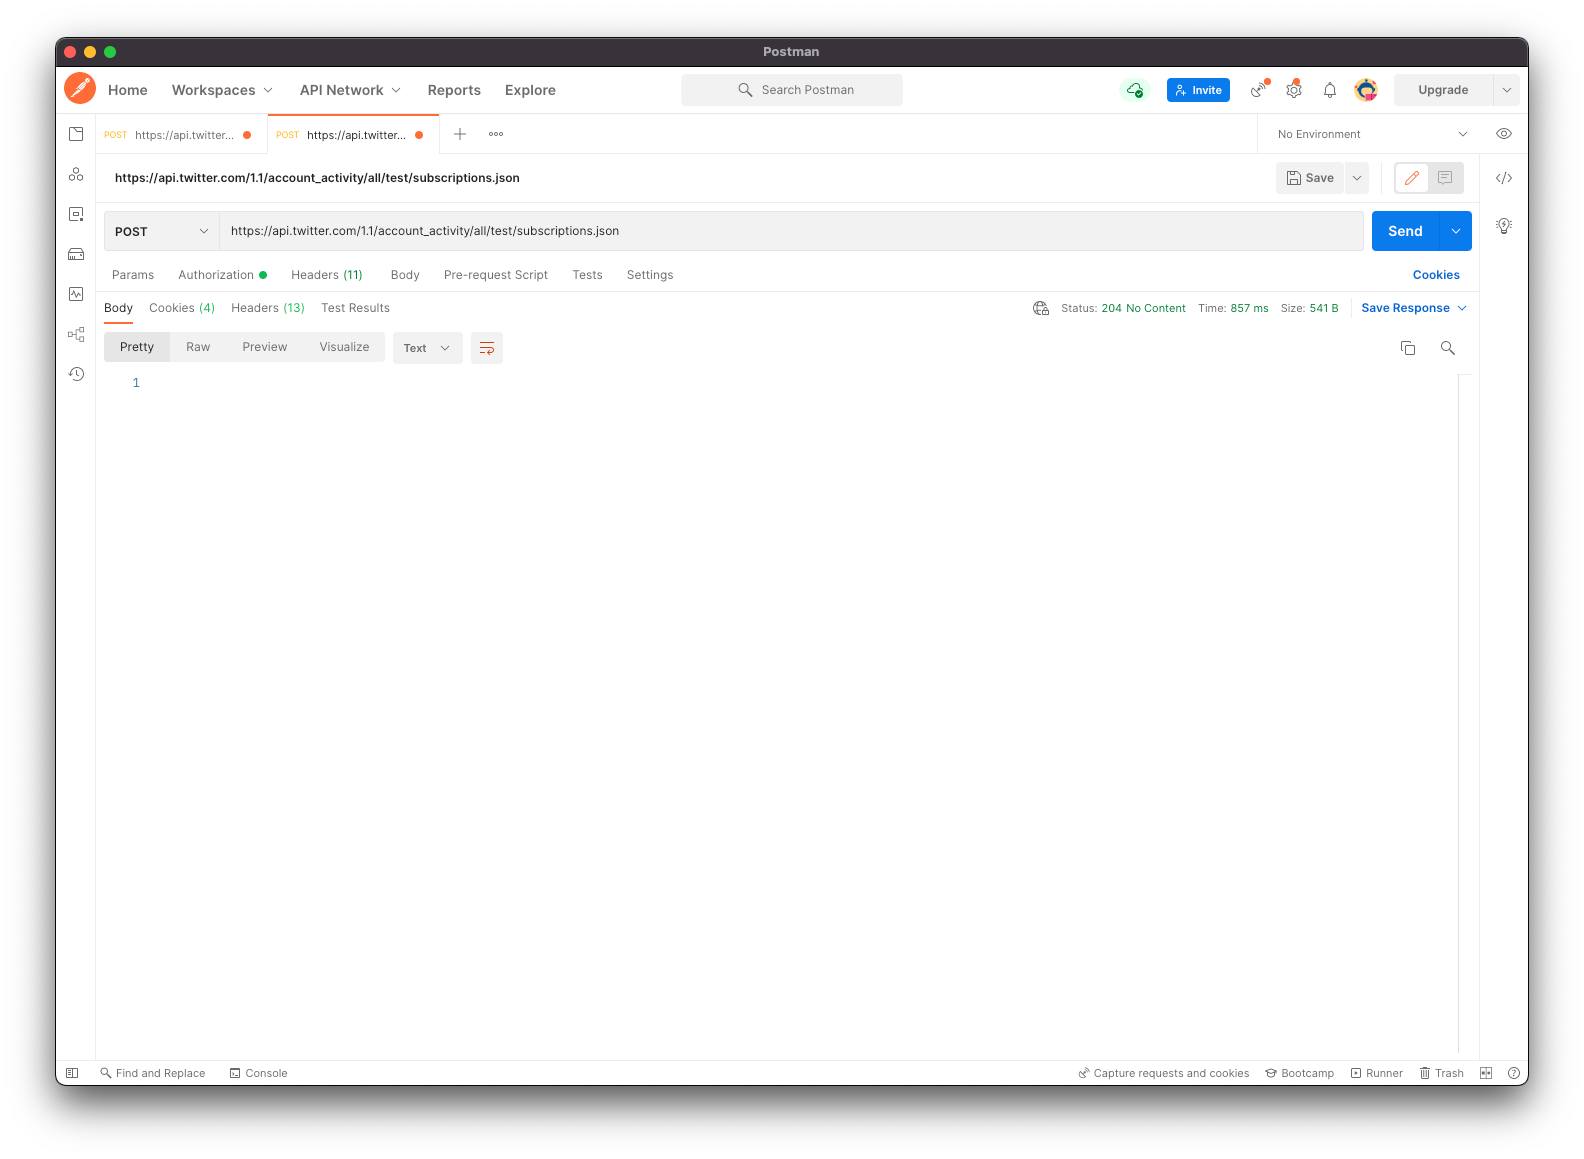
Open Postman and paste the following URL in the address bar: https://api.twitter.com/1.1/account_activity/all/[ENV_LABEL]/subscriptions.json. Replace [ENV_LABEL] with the dev environment label. Change the HTTP Method to POST and use the same authorization credentials you used earlier.
Click on Send to make the request. If the request was successful, you will get a status 204 No Content.
Congratulations! You now have an automated workflow that gets triggered when an account activity happens.
Summary
In this article, you learned about the Twitter Account Activity API and how to access it. You learned to create an automation workflow that handles the verification process. You also learned to register the webhook URL with the Account Activity API. And lastly, you learned to create a subscription for a user.
Since you used the Production URL, you will have to check the Execution List in n8n to view the incoming data. I suggest you refer to the video “How to Mock Data to create workflows in n8n” to learn the trick to mock data. This trick will help you further design your workflow.
What’s next?
The Twitter Account Activity API unlocks a plethora of possibilities. You can create a bot that will automatically respond to Direct Messages. Like me, you can update your profile banner when someone new follows you. You can also use it for creating a database of all your liked tweets.
I am excited to know about your use case. Feel free to share with me on Twitter. As usual, if you run into issues or need further help, drop me a DM. I promise you won’t be interacting with a bot!