I was always fascinated by the idea of live streams and wanted to try them for a while. One of the results of online events and remote work was that I got to try live streaming.
I started live streaming on Twitch in early July last year. On my live streams, I built projects and try out new technologies. When I started, I wasn’t sure if I was going to enjoy it. After doing a few live streams, I started enjoying it and continued doing more live streams.
However, I also got exhausted with the process that I followed. Whenever I went live, I manually tweeted about it and shared it on Discord servers to let the people know that they can join me. I wanted to automate this process. I could have written a script to do this. But why write code when you can do it without writing any?
In this blog post, I will walk you through the process of building an automation workflow using n8n. This workflow will post a tweet whenever you go live on Twitch!
Prerequisites
Twitch
You will create a Twitch application to get access to the Twitch API. You will need a Twitch account. Sing-up on Twitch to create an account if you don’t have one.
Twitch CLI
You will use Twitch CLI to get the App Access Token, Broadcaster ID, and connect your Twitch app with n8n. Install Twitch CLI by following the instructions mentioned in the documentation.
Postman
You will have to make a POST request to configure your n8n webhook URL with the Twitch app. This tutorial will walk you through the steps of making this request using Postman. Using Postman is optional. You can use other tools or even make the request with cURL.
n8n
You will build our automation workflow using n8n. You can follow the instructions mentioned on the documentation to use n8n locally or host it on your server (documentation, video).
You can even sign-up for the n8n.cloud, which is a cloud hosting service by the company.
Note: If you’re using n8n locally, make sure to start the tunnel.
Create a Twitch application
Twitch started as a live streaming platform for gamers, but slowly the categories expanded, and now you can find developers live coding on Twitch.
To get started with the automation, you need to create a Twitch application. Login to the Twitch Developer console and select the Applications tab. Click on the + Register Your Application button to register a new app.

Enter your application name in the Name field. Since you will be using the Twitch CLI enter http://localhost:3000 in the _OAuth Redirect URLs _field. Select a category from the Category dropdown list and complete the CAPTCHA to verify that you’re a human 🤖
Click on the Create button to register your Twitch application.
Configure Twitch CLI
Twitch CLI is a command-line based tool that enables you to develop with Twitch easily. Using the Twitch CLI you will do the following:
- Get App Access Token
- Get Broadcaster ID
You can install the Twitch CLI by following the instructions mentioned in their documentation.
Get App Access Token
There are various commands that you can execute using the Twitch CLI. The CLI currently supports the following:
- API: Allows you to interact with the Twitch API
- Configure: Allows you to set credentials (Client ID and Client Secret) that enables you to run the
tokenandapicommands - Event: Allows you to trigger mock events for local webhook testing or migration
- Token: Allows you to fetch App Access Token and User Token
- Version: Returns the current version of the CLI (At the time of writing this tutorial, I am using version
1.0.0)
You need to configure your Twitch CLI and connect it with the Twitch App you created earlier. Execute the command twitch configure. Copy the Client ID from your Twitch Dev Console and paste it into your terminal. Similarly, copy and paste the Client Secret.
Note: If you can’t find the Client Secret on the Twitch Dev Console, generate a new secret by clicking on the New Secret button.
Once you’ve successfully connected the Twitch CLI with your app, run the command twitch token. This will generate an App Access Token. You will need this token to make a POST request to the Twitch API.
Get Broadcaster ID
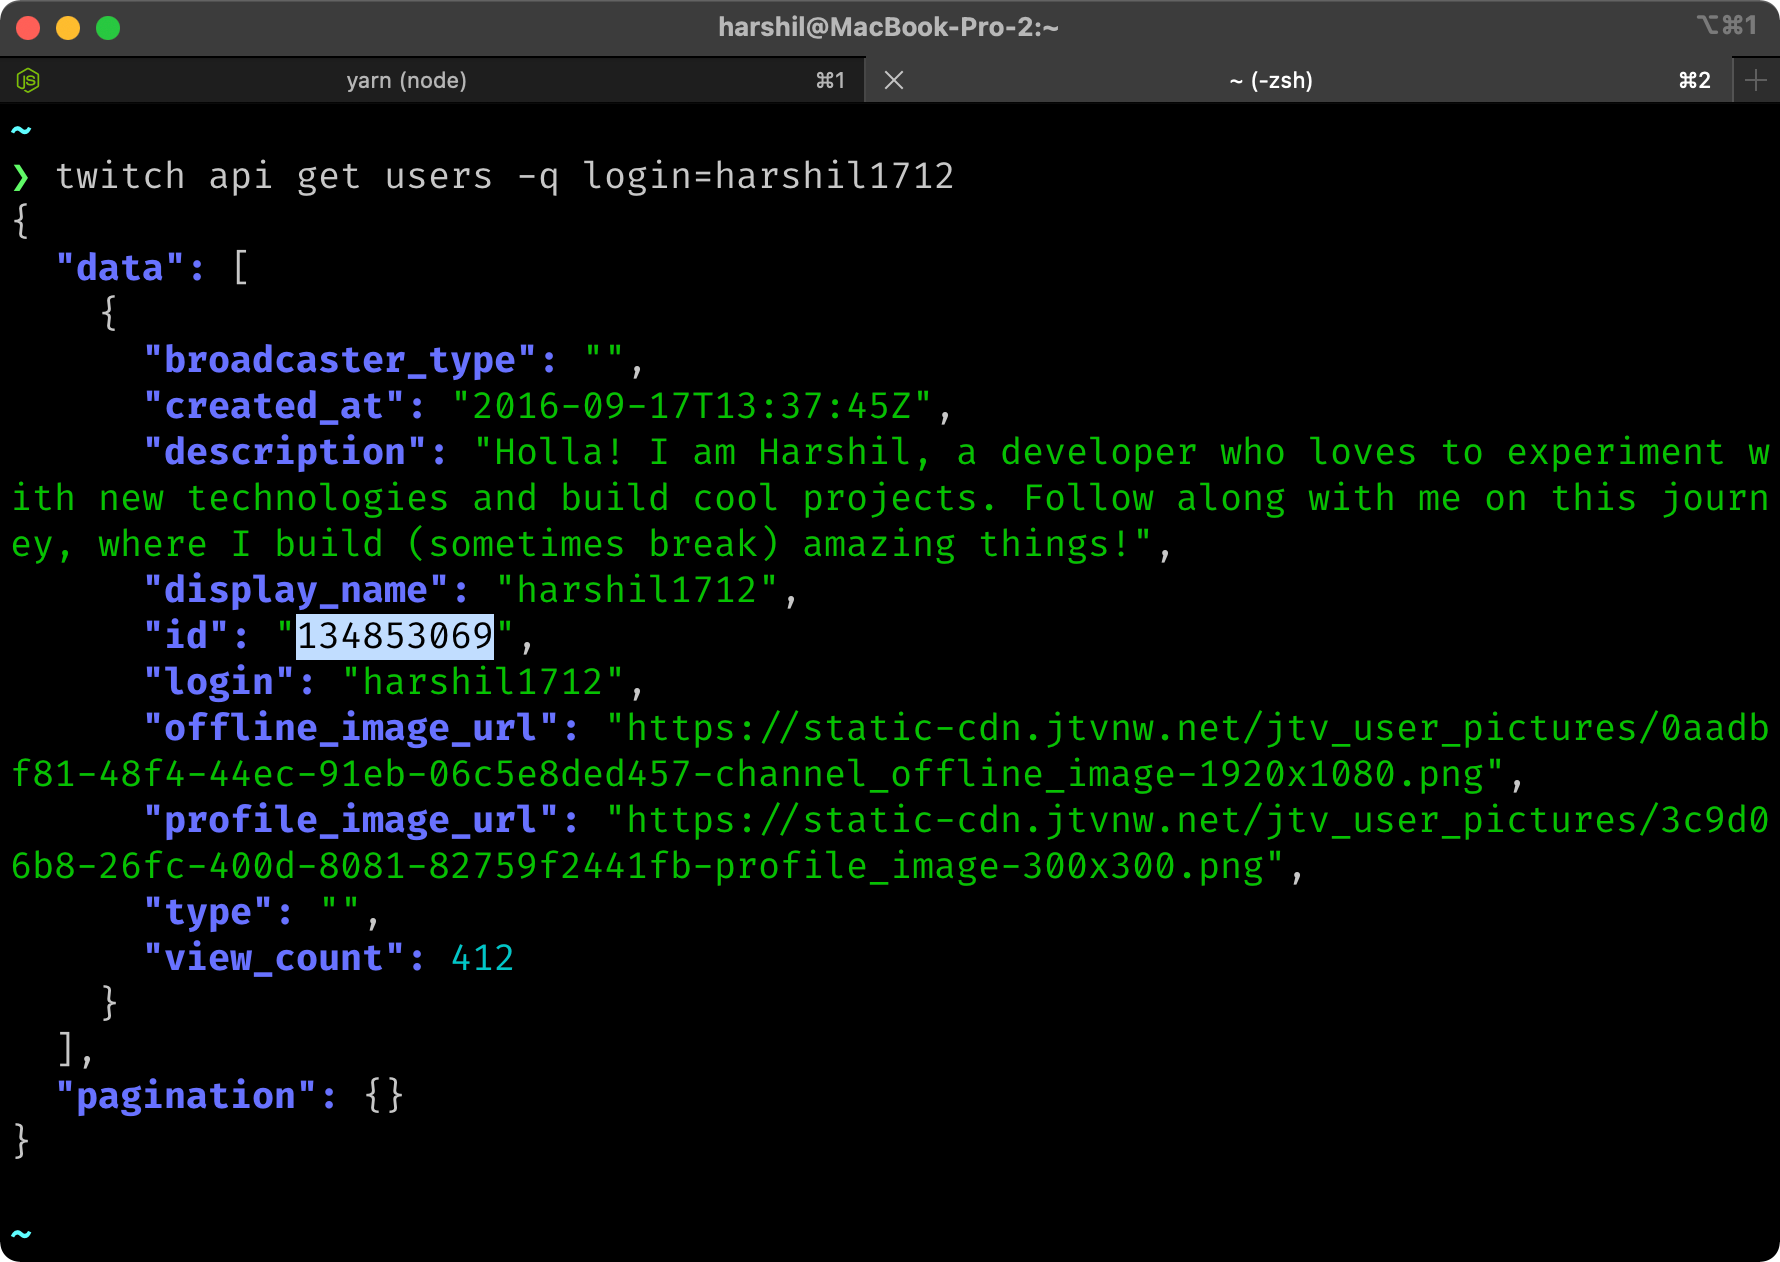
Twitch generates a unique ID for all the streamers. You need your Broadcaster ID to trigger the n8n workflow whenever you go live on Twitch. You can also get the Broadcaster ID of other Twitch streamers and trigger the workflow when they go live!
To get a Broadcaster ID, use the command twitch api get users -q login=YOUR_USERNAME (replace YOUR_USERNAME with your Twitch username).
Get your n8n Webhook URL
You have almost all the ingredients required to connect your Twitch App with n8n. The last ingredient you need is the webhook URL. When you go live, Twitch will make an HTTP request to this URL. You will use the Webhook node in n8n that will listen to this request and trigger the workflow.
To add a Webhook node, click on the + button and select the Webhook node under the Trigger section. Save the workflow to register the webhook ID. You can use the keyboard shortcut CMD+S (or CTRL+S) to save a workflow in n8n, or use the menu option on the left: Workflow > Save As.
In the Webhook node, select ‘POST’ from the HTTP Method dropdown list. Twitch makes a POST request, hence you need to tell our webhook to listen for a POST request.
Click on Webhook URLs. This will reveal two webhook URLs: Production URL and Test URL. The Test URL is used when you’re building and testing your workflow. Once you have built your workflow, you use the Production URL. Another important thing to note here is that while using the Production URL the workflow should be active and no data gets returned in the editor UI. To learn more about the Webhook node, refer to the documentation.
Click on Test and copy the displayed URL. Navigate to your terminal and run the following command:
twitch event verify-subscription streamup -F PASTE_TEST_WEBHOOK_URLYou will receive a similar output as in the image below.
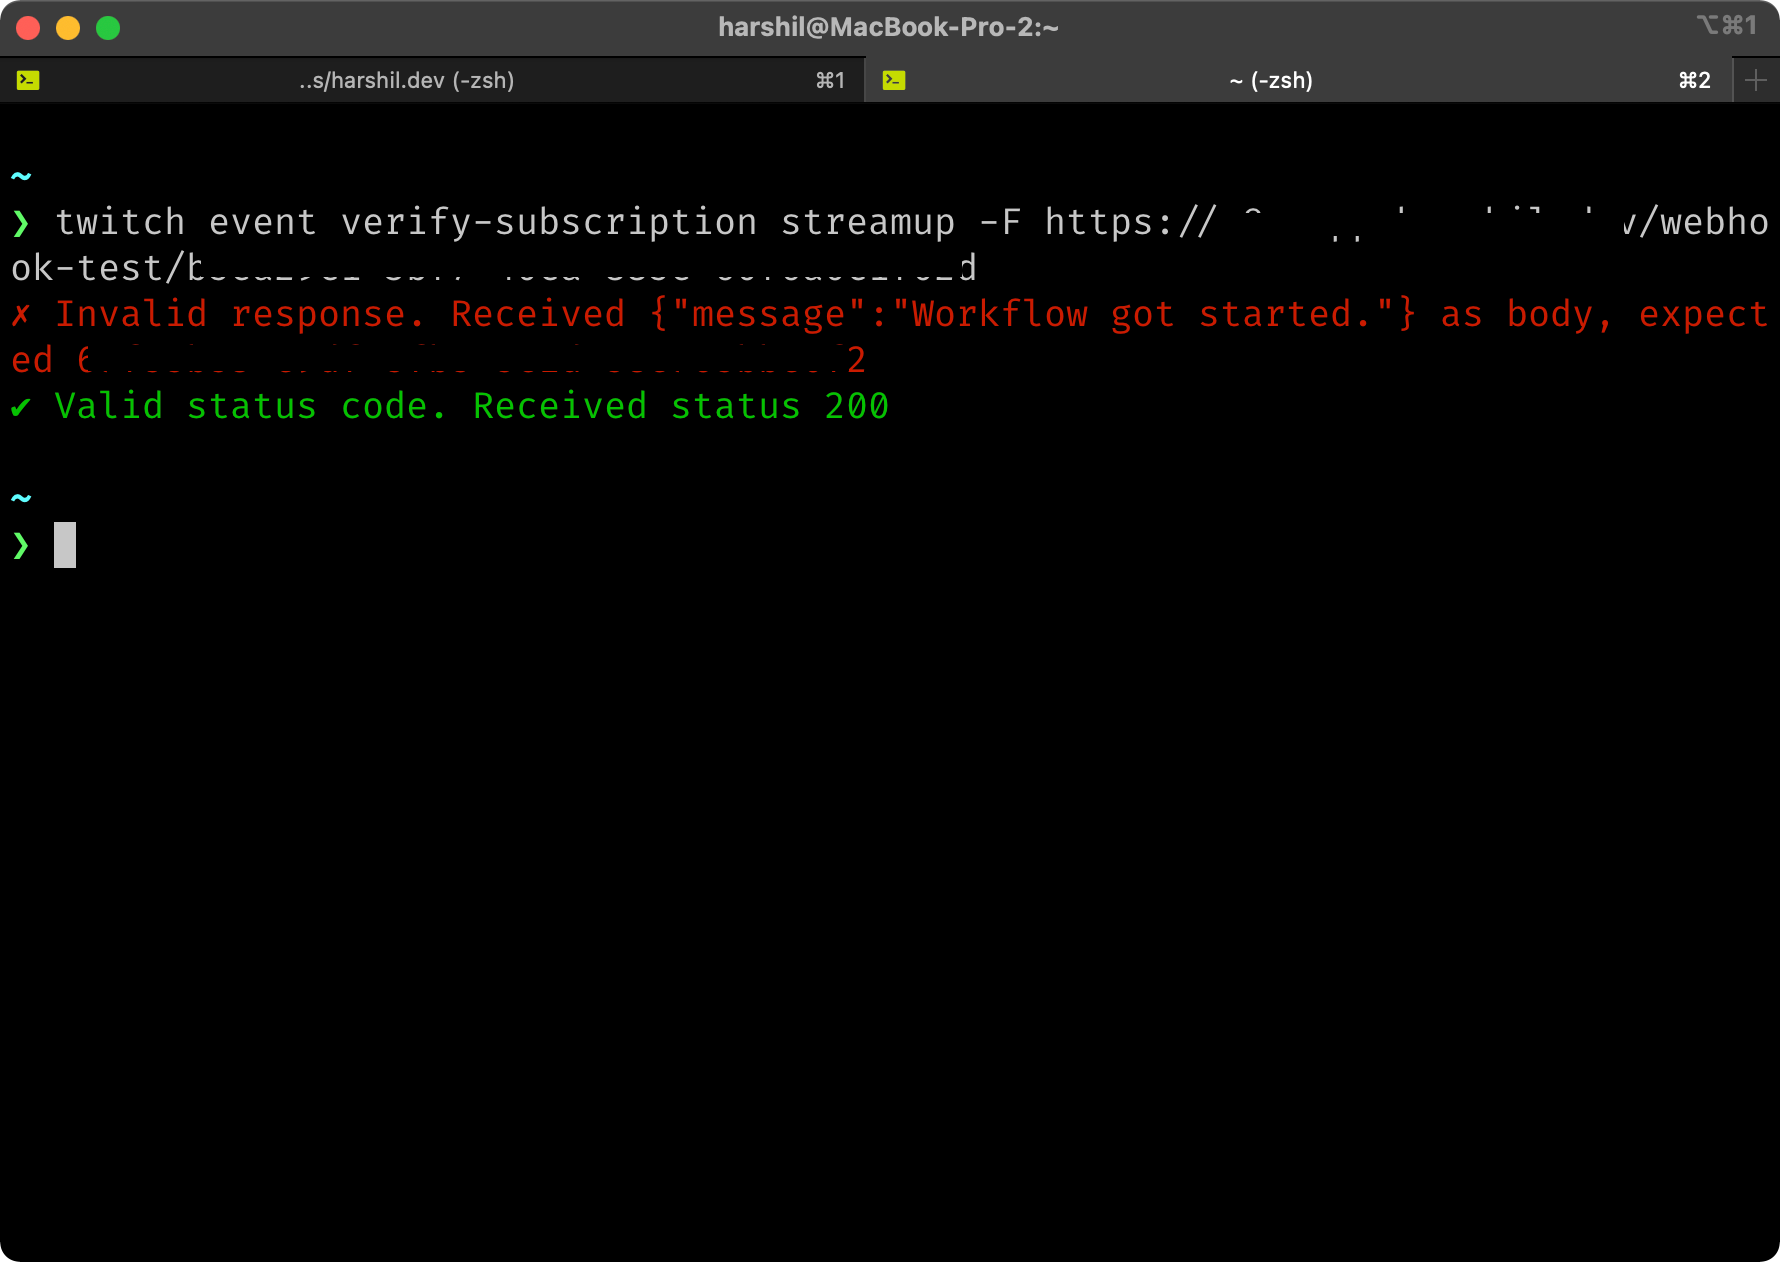
To verify that the call was made from a Twitch app, the webhook call needs to send back the challenge to Twitch. Select ‘When last node finishes’ from the Response Mode dropdown list. The first item from the last node in the workflow will be sent as a response to Twitch.
However, Twitch accepts a string and not JSON. Click on Add Option and select ‘Property Name’. Enter challenge in the Property Name field. The value of the JSON item challenge will be sent back as the response.
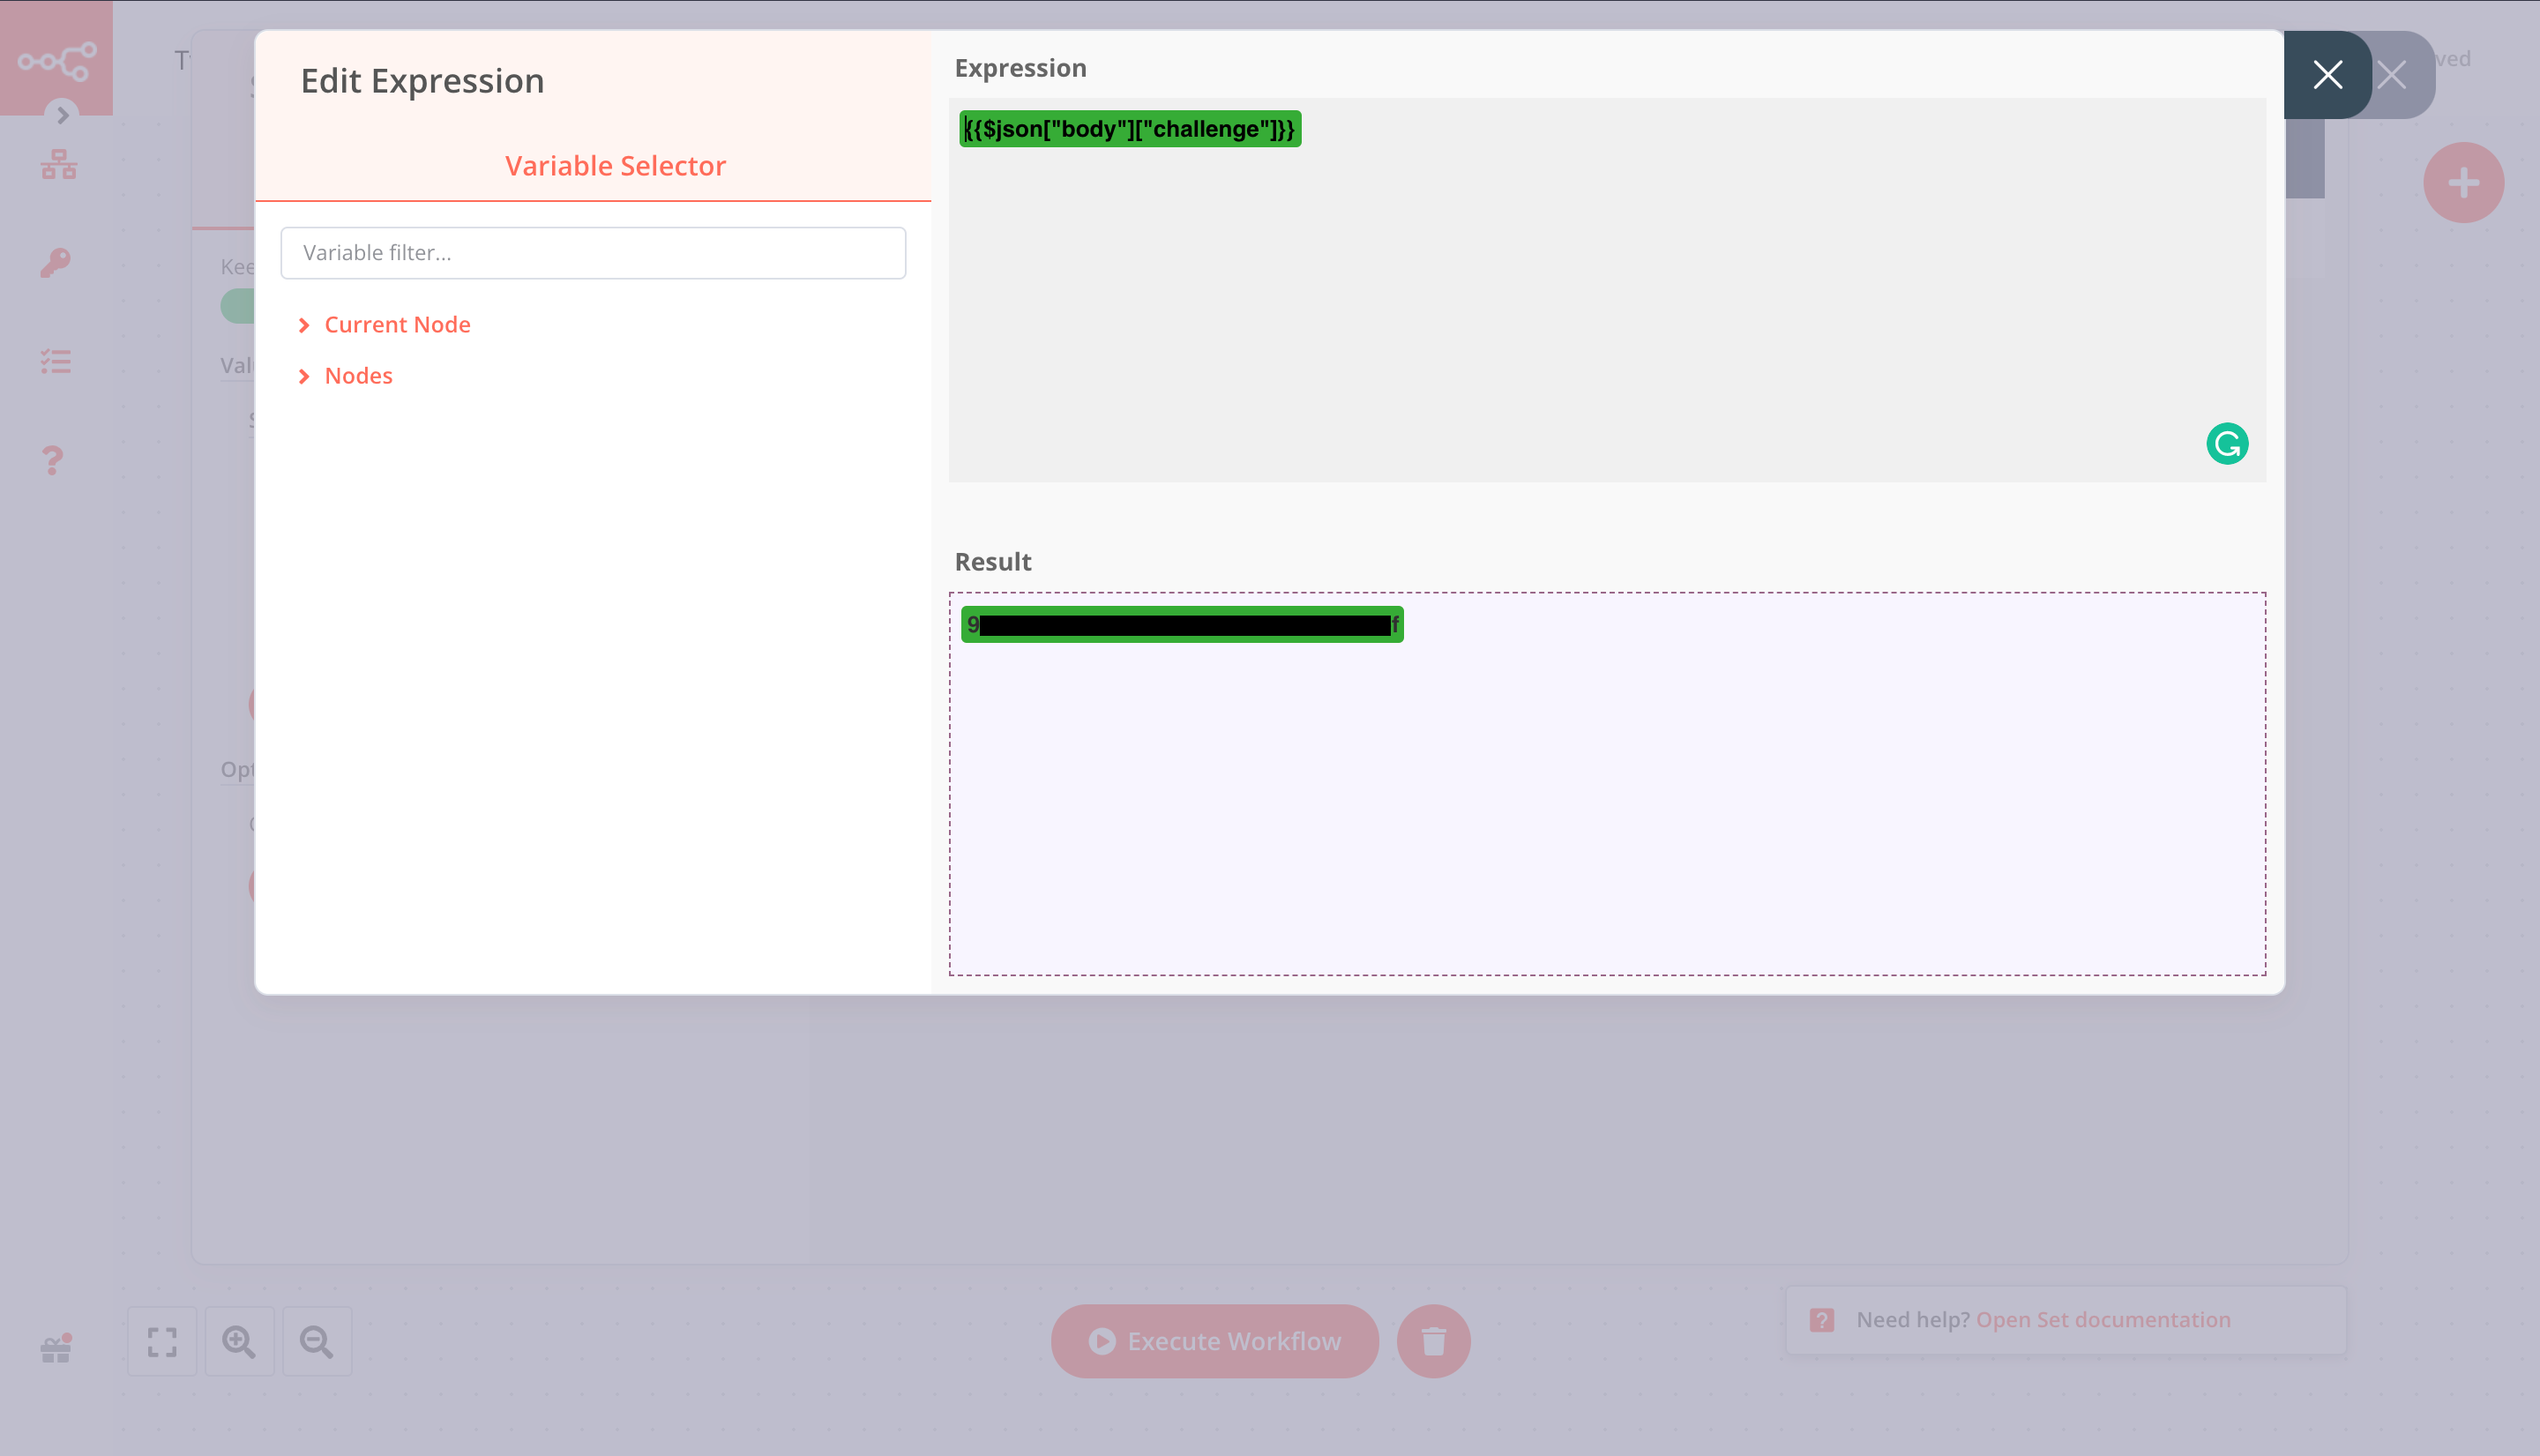
The next step is to capture the challenge sent by Twitch and send it back as a response. Click on the + button and add a Set node. Click on Add Value and select ‘String’ from the dropdown list. Enter challenge in the Name field. You need the value of the challenge from the Webhook node. Click on the gear icon next to the Value field and select ‘Add Expression’. From the Variable Selector section select: Current Node > Input Data > JSON > body > challenge. Alternatively, you can add the following code snippet in the Expression editor {{$json["body"]["challenge"]}}.
In the Set node, toggle Keep Only Set to true. This option will only return the values we have configured in this node.
You are almost there! The last step is to subscribe to the stream.online event and add your webhook.
Connect your Twitch app with n8n
Twitch introduced EventSub that allows you to subscribe to events and receive notifications for that event. To receive notifications, you have to create a subscription. You will create a subscription that will allow you to connect n8n with Twitch and receive notifications.
To create a subscription, you will make a POST request to the URL https://api.twitch.tv/helix/eventsub/subscriptions with a JSON body. Open Postman and paste the URL. Change the request method to POST. Set the following headers:
| Key | Value |
|---|---|
| Client-ID | TWITCH_APP_CLIENT_ID |
| Authorization | Bearer APP_ACCESS_TOKEN |
In the Body, enter the following code.
{ "type": "stream.online", "version": "1", "condition": { "broadcaster_user_id": "Your_BROADCASTER_ID" }, "transport": { "method": "webhook", "callback": "YOUR_WEBHOOK_URL", "secret": "someSecret" }}You will receive a response similar to this:
{ "data": [ { "id": "40c78105-b7c8-4252-b27b-42bb4469718e", "status": "webhook_callback_verification_pending", "type": "stream.online", "version": "1", "condition": { "broadcaster_user_id": "134853069" }, "created_at": "2021-04-17T22:43:38.400804295Z", "transport": { "method": "webhook", "callback": "" }, "cost": 1 } ], "limit": 10000, "total": 2, "max_total_cost": 10000, "total_cost": 2}You can execute the following command to get a list of all the subscriptions you’ve created.
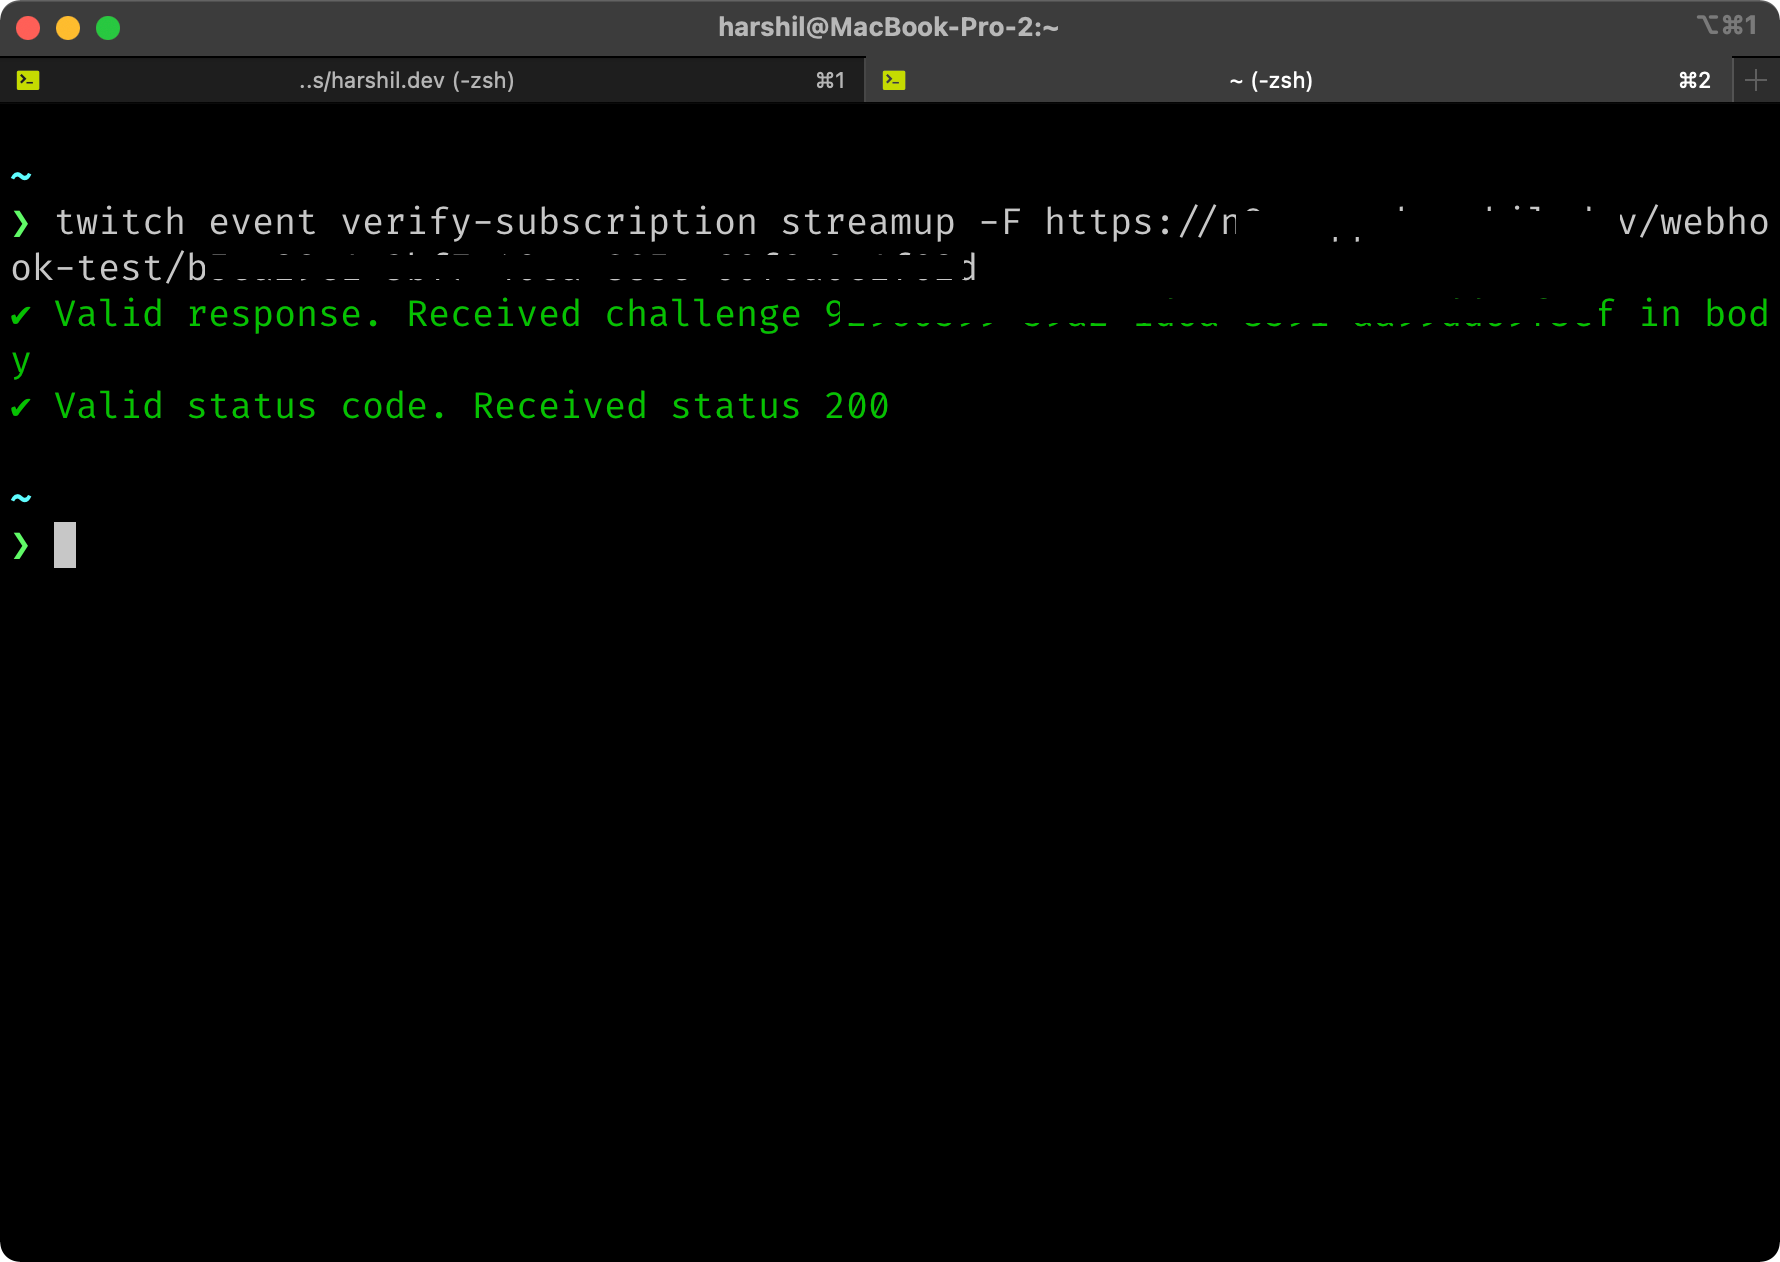
twitch api get eventsub subscriptionsYou can also verify your subscription by running the following command.
twitch event verify-subscription streamup -F PASTE_TEST_WEBHOOK_URLIf you followed all the steps, you will now get a success message for both Valid Response and Valid Status Code.
Summary
In this tutorial, you learned a lot of new things. Let’s do a quick recap!
You learned that you can connect Twitch with n8n via the Twitch EventSub API. You learned how to create a Twitch App and use the Twitch CLI tool. You also learned about n8n, how to use the Webhook node, and also how to send a custom response using the Set node.
What’s next?
In this tutorial, you learned how to connect Twitch with n8n. Your workflow is still in development (remember you used the Test Webhook URL!). Follow the steps to configure your production webhook. This will trigger your workflow when you’re live on Twitch and you don’t have to execute the workflow manually.
The next part is to connect other nodes and build the workflow. Don’t limit yourself to just making a Tweet (using the Twitter node) when you go live. Take advantage of other nodes like the Discord node and Telegram node to send a message to your community and friends when you stream. You can even create and share posters for your live streams!
I would love to see what you build! Feel free to share it with me on Twitter. If you face any issues or have any questions, my DMs are open!